I needed a little something for the women I work with, so I decided to make them some sugared hand scrub. I got the recipe for this from Carrie at Greenbean's Crafterole. Check out her blog ... she has some great projects. For my containers, I used 4oz jelly jars. The scalloped circles and holly leaves are from the Winter Woodland Cricut cartridge. The 'berries' are frosted gems from Martha Stewart. The labels are computer generated, cut with Nestibilities and tied on with a little Stampin' Up ribbon. Quick, easy, fun-to-make, impressive ... what more could you ask for! Thanks for stopping by.
Thursday, December 30, 2010
Wednesday, December 29, 2010
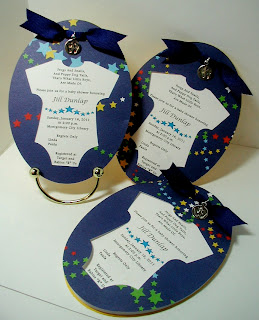
Baby Shower Invitations - With Gypsy File
I can't take credit for this design ... it was originally done by Nancy Damiano, one of the designers from the Circut Circle blog ... but I did 'change it up' a little.
These were made using the cute Onesie on the Wrap it Up Cricut cartridge. Using my Gypsy, I eliminated the single hole; then I welded two circles from the George and Basic Shapes Cricut cartridge to the top of the shape to accommodate my ribbon.
Three layers make up each invitation: the top layer cut from designer paper using the Tag Feature, the bottom layer cut from card stock using the Tag Blackout Feature, and the center layer cut from a light-weight card stock (from the office supply section at WalMart) also using the Tag Blackout Feature. I cut the center layer just a bit smaller than the other two layers.
The layers are held together with the ribbon (no adhesive), and I added a little charm. These were actually very easy to make. I made 60 and they went together quickly. Also, they fit perfectly in an A2 size envelope .
If you're interested , you can download the Gypsy file and a Word file for the middle layer. The Gypsy file is designed so you can five images from a 12"x12" sheet of paper or card stock (for the top and bottom layers).
Word File Download
For the middle layer, the Gypsy file will cut two images from an 8.5" x 11" sheet of light-weight card stock. Lay your printed sheet on your mat as shown here.
Labels:
George,
Gypsy File,
Invitation,
Wrap it Up
Monday, December 27, 2010
Another Gift Box with Glitter Ornaments
This is a gift box I made for my friend Peggy. All the papers are from the DCWV Homemade Christmas stack and the card stock is Michael's Recollections brand.
The 'doily' cut is from the Picturesque Cricut cartridge. I spritzed it with water and crumpled it, then inked it with distressed ink and Champagne Mist Shimmer Paint from Stampin' Up. I added a pleated strip ... also inked with the Champagne Mist.
The horn is from the French Manor Cricut cartridge. I cut each layer three times from a cream card stock and adhered them together. The horn was inked it with a bronze ink ... the valve piece was inked with brown. To finish, I embossed it with several coats of UTEE.
More Champagne Mist inked on the sides of the box, then I added a ribbon and some teal jewelry wire.
Here's a look at the glitter ornaments ... made using the 'floor wax' technique and Martha Stewart glitter. Check out this video for glitter ornaments instructions.
Labels:
Altered Box,
French Manor,
Glitter Ornament,
MS Glitter,
Picturesque,
UTEE
Sunday, December 12, 2010
For the Dogs
This was entered in the following challenges:
Circut Circle Blog - December Challenge
Fantabulous Cricut Challenge Blog - #39 Gifts Galore
Frosted Designs - Ribbon
Fussy & Fancy Friday Challenge - #25 Anything But a Card
Pile it On - #48 It's All in the Wrapping
Really Reasonable Ribbons - #13 Anything But a Card - Winter
Each year, my neighbor Diane hosts a neighborhood Christmas dinner party and I always make a gift to take to her. For this year's gift I decided to make glitter ornaments and a gift box.
Diane has three, much-loved dogs so I thought it would be fun to make the ornaments for the dogs. I used the "floor wax" technique and red Martha Stewart glitter to make the glitter ornaments. If you're not familiar with this technique ... check out this video. Using my Gypsy and Lyrical Letters, I sized and welded the letter of their names and cut them out of white vinyl. For the back of the ornaments, I cut this cute little dog using Paper Pups and the star from the Christmas Solutions cartridge. The dog's eye was too small to cut from the vinyl, so I used a paint pen to add a small dot. Each ornament is topped with a little red and white gingham ribbon from Stampin' Up.
The gift box is a 6" x 6" paper mache box. I painted it with three coats of Light Buttermilk Americana acrylic paint. I used paper from the DCWV Homemade Christmas stack to cover the sides and top of the box. The red striped ribbon is also from Stampin' Up. I adhered two pieces to both the box bottom and top, making sure they 'lined up' when the top was placed on the box. I added another piece of patterned paper to the inside of the lid to hide the ends of the ribbon. For the bottom of the box, the ribbon ends are hidden by tissue paper. I then tied a big bow on the top of the lid.

The tag and phrase were cut from the Winter Frolic cartridge using more of the DCVW paper and card stock from Stampin' Up. The tag was cut at 2.5" and the phrase was cut at 2". I used pop dots to attach the phrase to the tag and added some bronze pearls.
Here's a look at the complete project. Hope you like it ... thanks for stopping by!
Saturday, November 20, 2010
Take a Little Time to Pamper Yourself!
I made this card for my friend Karen. Her 60th birthday is tomorrow and several friends and I put together a gift basket of fun stuff she can use to pamper herself. We also included gift certificates for a massage, pedicure, hair cut and style, and dinner at a nice restaurant. I know she'll love it!!
The image is from Stamping Bella, colored with Copics and all the papers and card stock are from Stampin' Up.
The beads were actually a pair of earrings I got at a craft fair. I don't wear dangly earrings, but I love beads and knew I could put these to good use somewhere.
 The sentiment is computer generated. I printed it first on plain paper. Then I taped my patterned paper over the original printing and then printed again.
Finally, here's a peek at the inside. Hope you like this one ... thanks for stopping by.
Labels:
Card Birthday,
Copic Markers,
Stampin' Up,
Stamping Bellas
Tuesday, November 2, 2010
Halloween 2010
I'm a little late in posting, but here are some of the things I made for Halloween.
These are treat bags I made for the kids in my neighborhood. The images are from Mini Monsters. I sized them with my Gypsy and used the Hide/Contour feature to eliminate the placement marks for the faces. Then I used stamps from Peachy Keen to stamp their eyes and mouths. The sentiment stamps are from My Pink Stamper and the paper is from DCVW. I also used the Martha Stewart 'Drippy Goo' punch.

I love these Peachy Keen stamps ... the little three-eyed monster face is my favorite.
For the glass block, I used vinyl and the Pumpkin Carvings cartridge. I cut a small piece of yellow vellum and layered it between the vinyl and the glass block. Here's the back side:
Finally, I totally stole this idea from Greenbean from the Cricut Circle message board. She comes up with some of the cutest stuff ... check out her blog here.
They're glass ornaments ... the inside was coated with Martha Stewart glow-in-the-dark glitter using the 'floor wax' technique ... Joy has a great video for glitter ornaments here.
The spiders are from Doodlecharms. I added googly eyes and a little ribbon. Hope you like my projects. Now it's on to Thanksgiving!
Wednesday, October 20, 2010
Country Life Thank You
I love the flower pitcher from the Country Life Cricut cartridge. This is my take on it ...
The cardstock is from Stampin' Up and the patterned paper for the background is from the DCWV Autumn Stack. I used a border punch from EK Success to edge the green checked paper.
The patterned paper for the flowers is from Cosmo Cricket. I cut each flower three times, inked and curled the edges, then layered. Each was finished with a brown self-adhesive pearl.
The pitcher was embossed with several layers of UTEE. I added a bow and a little tag (and shadow) from Tag, Bag, Boxes and More. The sentiment is a stamp from PaperTrey Ink's Mega Mixed Messages set. I'm really happy with this one ... thanks for stopping by!
Wednesday, October 13, 2010
Think Pink
This is my entry for the "Think Pink"contest on the Circut Circle blog. It's a birthday card for my friend Lori. The challenge was to make a project using at least two Cricut cuts and
three or more of the following elements:
Pink
Ruffles
Scallops
Flourishes
Glitter
Jewels
Supplies:
Card stock - PaperTrey Ink
Patterned paper - Stampin' Up
Cricut - Serenade Cartridge
Sentiment - My Pink Stamper 'Tweetie Hoo Puns'
Extras - Ribbon, crepe paper (for ruffle),
border punch (Stampin' Up),
Distress Ink, Stickles and self-adhesive pearls.
Labels:
Card Birthday,
My Pink Stamper,
Papertrey Ink,
Serenade,
Stampin' Up,
Stickles
Wednesday, September 22, 2010
Etched Wine Glass Set
One thing I've learned ... I'm not very good at photographing shiny things! I apologize for the poor quality of these pictures. Anyway, this is a wedding gift my daughter and I made. On my Gypsy, we created a monogram using the Songbird (for the D) and Jasmine (for the Ms) Cricut cartridges. We cut it out of vinyl and then used it to etch a wine bottle, four wine glasses and a platter.
Here's everything arranged in a basket ... we added lots of ribbon and silk fall leaves and berries.


A couple of close-ups:
For the tag on the bottle, I printed the sentiment on vellum and then cut it using the Tags, Bags, Boxes and More cartridge. I cut a second tag from a cream colored cardstock, layered it under the vellum tag and tied on the bottle with twine.
To finish, we attached a gift card made using paper from the DCWV 'Amber Autumn' stack. I added a little ribbon and a charm. The sentiment, stamped using brown ink, is from My Pink Stampers 'Friends and Family' set.
Labels:
Altered Item,
Etching,
Jasmine,
My Pink Stamper,
Songbird
Tuesday, September 21, 2010
Vegas Birthday
My daughter turned 21 years old on Friday the 13th, January 2006 ... the perfect setup for a Las Vegas birthday vacation. We stayed at the Paris Hotel and got this great nighttime picture of the Eiffel Tower replica that's in front of the hotel. So, when the Cricut Circle announced their French Manor cartridge contest, I decided to make a this for Stacey and use it as my entry.
It's a 10" x 10" shadowbox. The frames, cut using the French Manor cartridge, were colored with a bronze ink and embossed with Ultra Thick Embossing Enamel. I attached them to the mats for the pictures and then "pop dotted" them to the base with foam dimensionals. I etched the glass using the Eiffel Tower (also from French Manor) and the 'Vegas' from the Tie The Knot cartridge.
The journaling is computer generated.
My project wasn't selected as a contest winner, but I had a great time making this and Stacey loves it ... that's really what it's all about anyway!!
Labels:
Etching,
French Manor,
LayOut,
Tie the Knot,
UTEE
Monday, September 20, 2010
Cheers to You
My daughter needed a Wedding Shower card ... this is what I came up with:
It's a A2 size card. The cardstock is from Stampin' Up. The patterned paper is from K & Company, embossed using the Grace's Frame Cuttlebug folder. The flutes are from the Tie the Knot cartridge, cut at 3.75". I added stickles for the champagne and self-adhesive pearls for the bubbles.
Labels:
Card Wedding,
Cuttlebug,
Stickles,
Tie The Knot
Sunday, September 19, 2010
Our Shower Gift For Sarah
I made this for a wedding shower gift. I started with three cake plates (small, medium and large) that I got from Pier One. I stacked them and used a little hot glue on their bases to keep them from sliding around. I found some brightly colored kitchen towels that I rolled into 'cinnamon roll' shapes and placed them on the stand. I added some curly ribbon, then wrapped it all in cellophane and tied it up with lots more curly ribbon.
The gift card is 3" x 3". I used the butterfly from the Create a Critter cartridge. I cut the base twice and attached just the bodies together to give it a 3D look. The sentiment is a Whiff of Joy stamp.
Labels:
Altered Item,
Card Gifts,
Create a Critter
Saturday, September 18, 2010
Fresh Fruit Basket
This is a peck size fruit box … the kind you get at a Farmer’s Market or a U-Pick-It orchard … that held some very tasty peaches. I knew I could put it to good use instead of just throwing it away. I entered this in the Cricut Circle Infomercial Contest. It wasn't selected, but I still love it!
Here are the details:
1. 1. I used the Rectangle3 image from George and Basic Shapes (sized using my Gypsy) to cut strips of cardstock to cover the box, both inside and outside.
2. 2. Then, I used the Argyle Icon (shifted) image from Wild Card to create the “lattice”. Using my Gypsy, I sized and welding three images together to create lattice strips and wrapped them around the box.
3. 3. For the chalkboard, I used the Rectangle4 image from George and Basic Shapes to make the frame (sized and welding using my Gypsy). I used a textured cardstock and rubbed it with distressing ink to make it look more like wood, and then attached it to a piece of black cardstock.
4. 4. I used the Loop Dee Loo font from Lyrical Letters to create the “Fresh Fruit” … sized and welded with my Gypsy.
5. 5. All of the fruit images are from Preserves (cut from the cartridge, no Gypsy):
a. Watermelon1 – 6.75”
b. Blueberry1 – 2.75”
c. Lemon – 3”
d. Orange – 3.25”
e. Strawberry1 – 2.75”
f. Pineapple2 – 5.75”
g. Grapes – 5.75”
6. 6. I attached the images to the box with pop dots (various sizes) to add dimension.
7. 7. For finishing embellishments, I added a crepe paper ruffle around the top edge of the basket and wrapped ribbon around the handle.
Labels:
Altered Item,
Lyrical Letters,
Preserves,
Wild Card
Friday, September 17, 2010
Puppy Pyramid
I made this card for one of my daughter's co-workers. The image is a digital, colored with Prismas and OMS. The border was punched with an EK Success punch. I added a paw print button to the ribbon and the sentiment is computer generated.
It's hard to tell from the picture, but the colors are beautiful ... very rich. This is one of my favorites!!
Labels:
Card Birthday,
EK Success punch,
Prismas/OMS
Thursday, September 16, 2010
This Year's Fair Entry
This is a shaped card I made to enter into our county fair. The cake is from the Wedding Solutions cartridge. Using my Gypsy, I welded it to a rectangle from the George and Basic Shapes cartridge. The patterned paper and cardstock are from Stampin Up. I used UTEE to emboss the cake stand ... it really made it look 'glass like'. I added some flowers, pearls and lots of stickles.
Here's a look at the inside ... the sentiment is from Verve Stamps.
By the way, I did get a First Place ribbon for this one!
Labels:
Card Wedding,
George,
Gypsy,
Stampin Up,
Stickles,
Verve Stamps,
Wedding Solutions
Subscribe to:
Comments (Atom)


.jpg)


