Pages

Showing posts with label Paper Pups. Show all posts

Friday, September 9, 2011

Cricut 360° Blog Challenge #11 ... For A Hero

Welcome to another Cricut 360° Blog challenge. This week we are commemorating the 10th anniversary of 9/11 and making projects to recognize those who serve.


I love dogs, and I'm especially fond of working dogs, so I decided to make a card honoring the search and rescue dogs who worked at ground zero. I used Paper Pups, Stand and Salute, and Plantin Schoolbook (for the little white cross). The sentiment is computer generated and is the motto of Search and Rescue teams worldwide.

I hope you join us this week at the Cricut 360° Blog ... we have a special sponsor! 


Robyn from My Pink Stamper had donated one of her stamp sets, so link up your project for your chance to win "Freedom Rocks". Good luck and ...


Thanks for stopping by ...

Sunday, December 12, 2010

For the Dogs

This was entered in the following challenges:

Circut Circle Blog - December Challenge
Fantabulous Cricut Challenge Blog - #39 Gifts Galore
Frosted Designs - Ribbon
Fussy & Fancy  Friday Challenge - #25 Anything But a Card
Pile it On - #48 It's All in the Wrapping
Really Reasonable Ribbons - #13 Anything But a Card - Winter


Each year, my neighbor Diane hosts a neighborhood Christmas dinner party and I always make a gift to take to her. For this year's gift I decided to make glitter ornaments and a gift box.


Diane has three, much-loved dogs so I thought it would be fun to make the ornaments for the dogs. I used the "floor wax" technique and red Martha Stewart glitter to make the glitter ornaments. If you're not familiar with this technique ... check out this video. Using my Gypsy and Lyrical Letters, I sized and welded the letter of their names and cut them out of white vinyl. For the back of the ornaments, I cut this cute little dog using Paper Pups and the star from the Christmas Solutions cartridge. The dog's eye was too small to cut from the vinyl, so I used a paint pen to add a small dot. Each ornament is topped with a little red and white gingham ribbon from Stampin' Up.                                                     

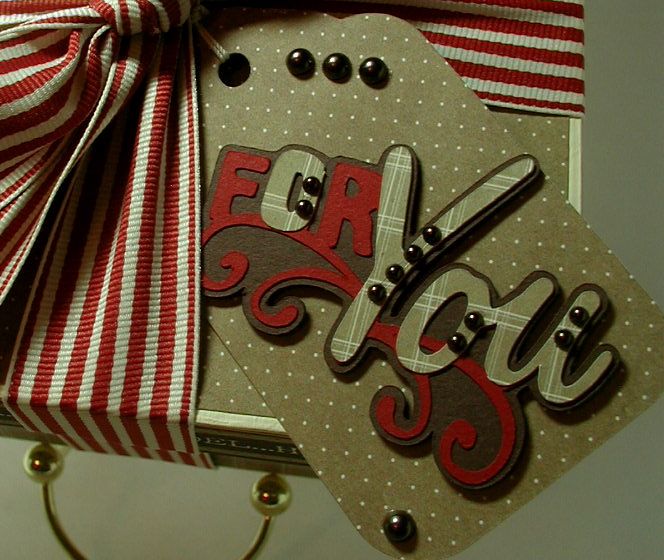
The gift box is a 6" x 6" paper mache box. I painted it with three coats of Light Buttermilk Americana acrylic paint. I used paper from the DCWV Homemade Christmas stack to cover the sides and top of the box. The red striped ribbon is also from Stampin' Up. I adhered two pieces to both the box bottom and top, making sure they 'lined up' when the top was placed on the box. I added another piece of patterned paper to the inside of the lid to hide the ends of the ribbon. For the bottom of the box, the ribbon ends are hidden by tissue paper. I then tied a big bow on the top of the lid.


The tag and phrase were cut from the Winter Frolic cartridge using more of the DCVW paper and card stock from Stampin' Up. The tag was cut at 2.5" and the phrase was cut at 2". I used pop dots to attach the phrase to the tag and added some bronze pearls.
Here's a look at the complete project. Hope you like it ... thanks for stopping by!

Friday, June 25, 2010

My Pink Stamper Design Team: Summer Fun


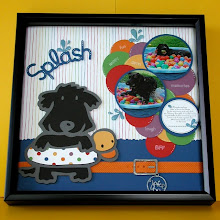
Okay, so this is a little out of my comfort zone. I'm a cardmaker, not a scrapbooker. In fact, this is the first layout I've ever done ... but the idea popped into my head and I had to go with it. This is my buddy Jake playing in his pool filled with water and brightly colored balls. Yes, Jake has his own pool ... which is just one of the reason we're known in our neighborhood as the crazy people with all those dogs!


I cut the dog, collar, buckle and tag from Paper Pups. The dog was cut with my Gypsy using the Hide/Contour feature ... which is my new favorite thing. I was able to cut the ducky floatie in three different colors without any waste. I couldn't find paper I liked for the floatie, so I used a hole punch to make polka dots from scraps of card stock and then adhered them to the white base. This was a real test of my patience ... but I like the end result.


I love how the collar, buckle and tag turned out! I used my Cuttlebug and the Herringbone folder to dry emboss the collar. The buckle and tag were cut from the cardboard from a paper stack. I inked them with silver ink and embossed them with Ultra Thick Embossing Enamel (UTEE). I attached the tag to the buckle using a couple of jewelry finds so it actually dangles ... yeah ... very proud of myself!!


The circles were cut using "George and Basic Shapes" and I used the center point key when I cut the pictures. The journaling is computer generated because it would make me crazy to try and do that by hand! Here you can also see the cute border ... it's a EK Success border punch.


 The splash is from "Create 
a Critter". I embossed the water drops with UTEE. I 
cut a few more, snipped off the water drops and embossed them to use as embellishments. 


I added sentiments using the My Pink Stamper's "Family & Friends" set and a little doodling. And, since I don't have an album for this, I framed my layout in a 12" x 12" shadow box. 


Now, hop on over to My Pink Stamper to see the other Design Team "Summer Fun" projects!!

Friday, October 23, 2009

It's Another October Birthday Card!


This is a quick and simple birthday card I made for my friend Lisa ... I had to be careful and not make it too "girly". I used my Gypsy to lay it all out. The argyle card base is from Wild Cards (Lisa loves argyle ... I be she has a hundred pairs of argyle socks), the ovals are from George and the dog and butterfly are from Paper Pups. I used some brown "pearls" for the dog's eye and to add a little detail to the butterfly. And, since I think no card is complete without ribbon, I added a little bow. This was a fun card to make and Lisa was tickled pink!