Pages

Showing posts with label George. Show all posts

Friday, August 19, 2011

Cricut 360° Blog Challenge #8 ... Back To School


Happy Friday! Here's my project for this week's Cricut 360° Blog challenge ... where we're headed "Back To School".
For my project, I decided to alter a notebook. I started with an inexpensive composition book and covered it with paper I printed using my Imagine and the Imagine More cartridge. Then I used my Gypsy with George & Basic Shapes to make the chalkboard frame and backed it with black cardstock. The font is from Lyrical Letters ... sized and welded with my Gypsy.
I added some frosted gems (from Martha Stewart), lots of ribbon and a cute little owl charm.
Of course, I needed an apple, so I went with the apple and books from Hello Kitty ... sometimes I forget what a versatile cartridge this is!

So, there you have it! Now it's you're turn ... head on over to the Cricut 360° Blog and show us your "Back To School" stuff!!

Thanks for stopping by ...

Friday, August 5, 2011

Cricut 360° Blog Challenge #6 ... Refreshing

It's Friday and time for another Cricut 360° Blog challenge. It's been crazy hot so we're going to try to cool things down with some refreshing projects!

For my project, I tried to recreate one of my favorite things: an Olive Garden Italian Margarita. My, oh my ... they are yummy!


There are martini glasses on a couple of Cricut cartridges, but no margarita glasses, so I used my Gypsy to make my own. I welded an oval from Plantin Schoolbook to the top of the martini glass from Smiley Cards to create the margarita shape. I cut it two times, one from white cardstock and one from frosted Shrinky Dink material. I used a Copic marker to ink the frosted side. It's kind of hard to tell from the picture, but I inked the stem of the glass with a light blue Copic marker. I used Glossy Accents to adhere some clear Martha Stewart micro beads to the rim. Then I used more Glossy Accents (just on the side edges) to adhere the Shrinky Dink layer to the card stock layer.


I like my margaritas 'on the rocks', so I used more the of Shrinky Dink material to make ice cubes. The rounded squares are from George and Basic Shapes. I used my Gypsy to weld three together to form a base. Then I cut three separately. I inked the frosted sides with a light blue Copic marker, and then embossed them with the Tiny Mosaic Cuttlebug folder. I used clear dimensional dots to attach them to the base and slipped them in between the Shrinky Dink material and the cardstock. I like how they look like they're floating. Of course, every margarita needs a straw ... I used a pipe cleaner (slipped behind the white cardstock) to make mine!


The orange slice is from Preserves. It looked a little flat, so I glossed it up with a thin coat of Glossy Accents. For my sentiment, I used Thickers from American Crafts. They're actually yellow, so I inked them with the same Copic marker I used on the margarita.


Oh, and I guess I should tell you my card is a 6" x 6" square and the designer paper is from Stampin' Up. I hope you join us for this week's challenge ... I'd love to see your refreshing ideas!!


Thanks for stopping by ...

Thursday, June 23, 2011

My Poor Neglected Blog!

June is such a hectic month for me ... I haven't had much time for blogging, but I have gotten some crafting done. I hope to get back to regular posting soon.
Here's a quick little card I made using a digital image from Mo Manning ... isn't it sweet!! I colored this with ProMarkers and then cut it out using Nestibilities. The blue circle is from the George and Basic Shapes Cricut cartridge, and the border was made using a punch from EK Success. I finished this with some pearls, ribbon and a dark gold button. I know it looks like an orange button, but really, it's gold ... that photography/lighting thing is tricky!!


Thanks for stopping by ...


Monday, May 16, 2011

Frank Got a New Boat!!


My husband, Frank, got a new boat this spring ... this was a really big deal really around our house! I used my Cricut and vinyl to cut the registration numbers (that go along the sides) and then Frank decided I should 'dress up' the back of the boat, too! Love it ... another reason to play with vinyl!

I used my Gypsy to lay this out and weld the letters. The font for the names is from the Lyrical Letters Cricut cartridge and the other font is from the George and Basic Shapes Cricut cartridge. Now, I was going to leave it at that, but Frank suggested adding a little fishing pole and make it look like an exclamation point. Who knew he could be so creative!? This pole is from the Simply Charmed Cricut cartridge and is actually pretty realistic looking. I thought it needed a little something else, so I added the bobber. I made the bobber by welding shapes from the George cartridge ... I'm really proud of that little bobber ... it's my favorite part of this!!


Here's the story about the other name on the boat: Tatum is the 4 year old grandson of one of Frank's fishing buddies. Tatum is just a sweetie and he adores Frank. Now we're not quite sure what Frank said to him, or when he said it (because Frank talked about this boat for months!), but apparently he told Tatum something about having to save money so he could get a new boat. Well, a few weeks before we got the boat, Tatum's mom stopped by our house with a dollar and instructions to give that dollar to Frankie 'cause he needed money for his new boat ... too cute! We figure this makes him a co-owner, so his name is on the boat, too!!


Thanks for stopping by ..

Monday, February 14, 2011

Sweethearts Gift Card Box

I made this gift card box for my daughter and I'm so happy with how it turned out. I've had this idea in my head for a couple of weeks ... just wasn't sure if I could get it to turn out like I imagined.
The box is the Crayola box from the Tags, Bags, Boxes and More Cricut cartridge. I used my Gypsy to size it as large as it would fit on a 12"x12" mat. The finished size of the box is about 6.5"x5". I used the George and Basic Shapes cartridge to cut out the heart shape on the front of the box, then I cut a piece of acetate and adhered that behind the heart cut out. The conversation hearts are from the Simply Charmed cartridge. I stamped them with sentiments from the My Creative Time "You Had Me at Chocolate" stamp set and then randomly placed them on the acetate ... attaching them to each other and to the edge of the heart cut out. I also attached a square of pink cardstock behind the conversation hearts to hide any gaps and to secure them a little more.
Finished with a ribbon, some buttons and a little tag. I used this to give a gift card, but it's a nice sized box ... you could put chocolate bars or a set of notecards in it for a fun little gift. If you're interested, there's Gypsy file available for this. Just click on the tab at the top of this page.

Thanks for stopping by ...

Sunday, February 13, 2011

Frank's Valentine 2011

This is a Valentine a made for my husband, Frank. The truck is from the Nate's ABCs Cricut cartridge. I embossed the truck with UTEE and added a little piece of vellum for the window.  The hearts are from the George and Basic Shapes cartridge and the sentiment is a stamp from My Creative Time "You Had Me at Chocolate" set. I used pop dots to adhere the truck to the card so the little heart is hanging freely. Cute!!

Thanks for stopping by ...

Wednesday, January 19, 2011

Going Buggy Challenge Card

Have you heard, Enfys had a big party on her blog last week. Lots of fun things to do and prizes, too. It's not too late to join in ... just click on the link at the top of my sidebar.
On day one, Enfys challenged us to Go Buggy and create a card with a bug on it. This is what I came up with. For my card, I chose one of my all-time favorite cuts from the Wild Card cartridge. I cut four of the petal layers and four of the leaves, inked the edges with Distress Ink and curled the petals.  I attached all the layers using clear Zot Dots to add some dimension. For the center of my flower, I cut a circle from the George and Basic Shapes cartridge, embossed it with my Cuttlebug and then inked it with Champagne Mist Shimmer Paint.

Now, for my bugs, I chose the Ladybug cut from the 'Just Because' Cards cartridge. I inked the bodies with a bit of shimmer paint and embossed the wings with UTEE. I think that makes them look at a little more realistic and not so flat. I also added some self-adhesive pearls to the Ladybugs and the card base.

Here's a side view to show the dimension of the layers ...

and a peek at the inside. The sentiment is a stamp from My Pink Stamper's Fruit & Veggie Puns set and all the papers are from Stampin' Up. I had a lot of fun "Going Buggy" at Enfys' blog party ... hope you do, too!

Entered in the following challenges:
Going Buggy Blog Party - Add a Bug
2 Sisters - Flowers
Fairy Tale - Flowers
Stamp Insanity - Let it All Hang Out
MelJen's Designs - Square or Round
Pile it On - Anything Goes

Saturday, January 8, 2011

Beer Gift Card Holder


My nephew asked me to make a gift card holder for a card he was giving to his dad. I got my inspiration for this card holder here ... thanks, Enfys! To create the shape, I used my Gypsy to weld an oval shape from George and Basic Shapes to the top of the mug from Gypsy Wanderings. I also used my Gypsy to hide the details on the mug. I then cut the mug four times: once from cream card stock, once from gold card stock, once from vellum and once (flipped) from patterned paper. I clipped the handle from the gold card stock and then layered them all together. The foam was created with Tulip Puff Paint. I added a computer generated sentiment and a pocket, from Tags, Bags, Boxes and More, for the gift card. It's not quite as I had pictured it in my head ... but I think it works!

Wednesday, December 29, 2010

Baby Shower Invitations - With Gypsy File

I can't take credit for this design ... it was originally done by Nancy Damiano, one of the designers from the Circut Circle blog ... but I did 'change it up' a little.
These were made using the cute Onesie on the Wrap it Up Cricut cartridge. Using my Gypsy, I eliminated the single hole; then I welded two circles from the George and Basic Shapes Cricut cartridge to the top of the shape to accommodate my ribbon.
Three layers make up each invitation: the top layer cut from designer paper using the Tag Feature, the bottom layer cut from card stock using the Tag Blackout Feature, and the center layer cut from a light-weight card stock (from the office supply section at WalMart) also using the Tag Blackout Feature. I cut the center layer just a bit smaller than the other two layers.
The layers are held together with the ribbon (no adhesive), and I added a little charm. These were actually very easy to make. I made 60 and they went together quickly. Also, they fit perfectly in an A2 size envelope . 
                                                                                        
                                                                                                      Gypsy File Download
If you're interested , you can download the Gypsy file and a Word file for the middle layer. The Gypsy file is designed so you can five images from a 12"x12" sheet of paper or card stock (for the top and bottom layers).


Word File Download

For the middle layer, the Gypsy file will cut two images from an 8.5" x 11" sheet of light-weight card stock. Lay your printed sheet on your mat as shown here.

Thursday, September 16, 2010

This Year's Fair Entry

This is a shaped card I made to enter into our county fair. The cake is from the Wedding Solutions cartridge. Using my Gypsy, I welded it to a rectangle from the George and Basic Shapes cartridge. The patterned paper and cardstock are from Stampin Up. I used UTEE to emboss the cake stand ... it really made it look 'glass like'. I added some flowers, pearls and lots of stickles. 

Here's a look at the inside ... the sentiment is  from Verve Stamps.
By the way, I did get a First Place ribbon for this one!

Monday, September 13, 2010

Golfer's Birthday Card

I used my Gypsy and the George and Basic Shapes cartidge to create the golf club and ball. I used Cuttlebug folders to dry emboss the golf ball and the golf club head & handle. I also embossed the golf club head with UTEE.
The grass was made using a Martha Stewart punch and the sentiments are from Verve Stamps.

Friday, June 25, 2010

My Pink Stamper Design Team: Summer Fun


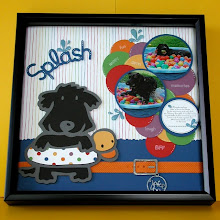
Okay, so this is a little out of my comfort zone. I'm a cardmaker, not a scrapbooker. In fact, this is the first layout I've ever done ... but the idea popped into my head and I had to go with it. This is my buddy Jake playing in his pool filled with water and brightly colored balls. Yes, Jake has his own pool ... which is just one of the reason we're known in our neighborhood as the crazy people with all those dogs!


I cut the dog, collar, buckle and tag from Paper Pups. The dog was cut with my Gypsy using the Hide/Contour feature ... which is my new favorite thing. I was able to cut the ducky floatie in three different colors without any waste. I couldn't find paper I liked for the floatie, so I used a hole punch to make polka dots from scraps of card stock and then adhered them to the white base. This was a real test of my patience ... but I like the end result.


I love how the collar, buckle and tag turned out! I used my Cuttlebug and the Herringbone folder to dry emboss the collar. The buckle and tag were cut from the cardboard from a paper stack. I inked them with silver ink and embossed them with Ultra Thick Embossing Enamel (UTEE). I attached the tag to the buckle using a couple of jewelry finds so it actually dangles ... yeah ... very proud of myself!!


The circles were cut using "George and Basic Shapes" and I used the center point key when I cut the pictures. The journaling is computer generated because it would make me crazy to try and do that by hand! Here you can also see the cute border ... it's a EK Success border punch.


 The splash is from "Create 
a Critter". I embossed the water drops with UTEE. I 
cut a few more, snipped off the water drops and embossed them to use as embellishments. 


I added sentiments using the My Pink Stamper's "Family & Friends" set and a little doodling. And, since I don't have an album for this, I framed my layout in a 12" x 12" shadow box. 


Now, hop on over to My Pink Stamper to see the other Design Team "Summer Fun" projects!!

Monday, May 24, 2010

Congratulations, Jessica!

One more graduation card. This image is one of my absolute favorites ... it's a Stamping Bella ... colored with Prismas and OMS, then cut with Nestibilities. The blue and white ovals were sized and cut using my Gypsy and George, and the blue label is from Gypsy Wanderings. The patterned paper is from a K & Company paper pad (Black and Ivory Fusion) and the sentiment is from PaperTrey Ink's Mega Mixed Messages set. I added eyelets to the label, and finished it with some bright pink ribbon and rhinestones. Oh, and I'm sure there are some pop dots somewhere ...

Sunday, May 2, 2010

NSD May Day Project

The is the challenge project and video I made for My Pink Stamper's National Scrapbook Day event.
This is my first video, so it's a little rough ... I hope to make more, so maybe I'll improve with practice.

Here's the info:
Paper - Martha Stewart Playful Blue paper pad
Cricut - Wedding Solutions and George
Sentiment - MPS Simply Sweet Occasions set

Saturday, December 19, 2009

Christmas Bella Card


This is one of my Christmas cards for this year. I made a dozen of these for my sisters and some special 'girl friends'. The image is from Stamping Bella, colored with Stampin' Up markers. The sentiment stamp is from Stampendous. I used the George cartridge to cut the circle and rectangles, the Gypsy Wanderings cartridge for the scalloped circle and the Tag, Bags, Boxes and More cartridge for the sentiment tag. The edges were inked with Tim Holtz Distress Ink.

If you look closely, you'll see I used Martha Stewart tinsel glitter on Bella's hat and boots, and I used Martha Stewart microbeads for the holly berries. Martha has come up with some really cool bling!


For the inside, I used the Winter Woodland cartridge for the holly and Gypsy Wandering for the "Fabulous". The inside is not quite what I had in mind, but it's works. Overall, I'm happy with this one ... hope you like it too!


Thursday, November 26, 2009

Happy Thanksgiving


I hope all of you are having a wonderful Thanksgiving Holiday, and for those who don't celebrate Thanksgiving, I hope you're having a marvelous Thursday. Please know that I am truly thankful for all the wonderful friends I've made on the Cricut messageboards and here on my blog. Thanks to all of you for your support and inspiration.


This card was designed with Gypsy using George Basic Shapes and Gypsy Wanderings. The tree stamp is from Whipper Snappers (colored with Stampin' Up markers) and the sentiment stamp is from Stampin' Up.

Friday, October 23, 2009

It's Another October Birthday Card!


This is a quick and simple birthday card I made for my friend Lisa ... I had to be careful and not make it too "girly". I used my Gypsy to lay it all out. The argyle card base is from Wild Cards (Lisa loves argyle ... I be she has a hundred pairs of argyle socks), the ovals are from George and the dog and butterfly are from Paper Pups. I used some brown "pearls" for the dog's eye and to add a little detail to the butterfly. And, since I think no card is complete without ribbon, I added a little bow. This was a fun card to make and Lisa was tickled pink!

Friday, July 3, 2009

Inspired by the Bitten by the Bug Blog Hop


Earlier this week, there was a blog hop with the Bitten by the Bug design team. They used the 'freedom' cut from Cricut's Graphically Speaking cartridge. I didn't get mine finished in time for the blog hop, but thought I'd post it anyway. The card base was cut using the Wild Card cartridge at 5 1/4". The cream circle is from George, cut at 4 1/4", and "Freedom" was cut at 3 1/4. The little bear is a colored graphic from Graphic Garden. I covered it with Crystal Accents to give it some dimension. I added a little stitching, some doodling and a ribbon. The flowers are from a sprig of silk flowers I got at a discount store and the leaves are from a Martha Stewart punch. I may have gone a little overboard on the leaves ... I just couldn't seem to stop myself. I've been a slacker this week and haven't left any comments on my favorite blogs, so now I'm off to do a little "blog hopping".Hope you all have a happy and safe holiday weekend.