Pages

Showing posts with label MS Glitter. Show all posts

Friday, October 28, 2011

Cricut 360° Blog Challenge #15 ... Think Winter


Hello everyone, are you ready for another challange from the Cricut 360° Challenge Blog? This week we're doing 'white-on-white' projects.


For my card, I started with a 5.5" x 5.5" base then added a layer embossed with the Snow Burst embossing folder. To highlight the embossing, I rubbed on a little White Frost shimmer paint. Both the embossing folder and the shimmer paint are from Stampin' Up. Then I tied on some white tulle and satin ribbon. The skates are from the Winter Woodland Cricut cartridge ... cut a 3.25". I sprinkled the blades with Martha Stewart coarse glitter, swiped more of the shimmer paint on the boots and finished them with some pearls and embroidery thread. It still looked a little plain, so I added the ribbon and snowflake charm. All in all, I'm pleased with this one, even though it didn't photograph very well ... it's one of those that looks better 'in real life'.

Now, here's a second card. Actually, I made this card first ... then I re-read the challenge requirements and realized that there isn't supposed to be any 'color' in the project. For this card I used a kraft base, inked all the edges with Tim Holtz Brushed Corduroy distress ink and used a kraft/white bakers twine for the laces. The sentiment is from My Pink Stamper's Winter Punnies set.

I like that you can get two very different cards using the same basic elements!!


So, now it's your turn. Link your project at the Cricut 360°Challenge Blog.  ... I'd love to see your project!!

Thanks for stopping by ...

Monday, January 17, 2011

Stacey's Happy Birthday Smiley Cake Card

This is a card I made for my daughter's birthday. Isn't that a happy face? It's from the Smiley Cards Cricuit cartridge.
I used my Gypsy to weld two of the base images together to create a shaped card and sized the layers to fit. I ran the 'frosting' and candle 'flames' through my Xyron and then glittered them with Martha Stewart glitter. The cheeks and cake plate were embossed with UTEE.
I used Tags, Bags, Boxes and More to make a gift card holder and the sentiment is computer generated. We both started diets on January 1st, so I thought the sentiment was appropriate!!
If you'd like the Gypsy file for this ... click here.

Saturday, January 15, 2011

My Pink Stamper Blog Hop Challenge Card


 Thought I'd try the My Pink Stamper Blog Hop challenge ... if you'd like to try too, click here.
This is from the Lacy Labels Cricut cartridge. I used my Gypsy to weld two labels together to create the card base, then sized and cut the layers to fit. I ran the scalloped layer through my Xyron and glittered it with Martha Stewart glitter. The heart is stamped with a sentiment from My Pink Stamper's "Family and Friends" set, then embossed with UTEE. I love how this turned out ... hope you like it, too!
If you'd like the Gypsy file, click here.

Saturday, January 1, 2011

Christmas Cards 2010


Here are few of the cards I made for Christmas 2010:


Just Because Cards
Peachy Keen Stamps
Tulip Puff Paint
DCVW Paper
PaperTrey Ink Card Stock
Martha Stewart Border Punch
Pearls and Ribbon


Winter Frolic
DCVW Paper
Stampin' Up Card Stock
PaperTrey Ink Card Stock
Stampin' Up Ribbon
Martha Stewart Glitter


Winter Frolic
DCVW Paper
Stampin' Up Card Stock
Cuttlebug Scrollwork Folder
Distress Ink
Champagne Mist Shimmer Paint
Martha Stewart Glitter
Ribbon inked with Distress Ink and Shimmer Paint

Monday, December 27, 2010

Another Gift Box with Glitter Ornaments

This is a gift box I made for my friend Peggy. All the papers are from the DCWV Homemade Christmas stack and the card stock is Michael's Recollections brand.
The 'doily' cut is from the Picturesque Cricut cartridge. I spritzed it with water and crumpled it, then  inked it with distressed ink and Champagne Mist Shimmer Paint from Stampin' Up. I added a pleated strip ... also inked with the Champagne Mist.
 
The horn is from the French Manor Cricut cartridge. I cut each layer three times from a cream card stock and adhered them together. The horn was inked it with a bronze ink ... the valve piece was inked with brown. To finish, I embossed it with several coats of UTEE.
More Champagne Mist inked on the sides of the box, then I added a ribbon and some teal jewelry wire.

           
Here's a look at the glitter ornaments ... made using the 'floor wax' technique and Martha Stewart glitter. Check out this video for glitter ornaments instructions.

Sunday, December 12, 2010

For the Dogs

This was entered in the following challenges:

Circut Circle Blog - December Challenge
Fantabulous Cricut Challenge Blog - #39 Gifts Galore
Frosted Designs - Ribbon
Fussy & Fancy  Friday Challenge - #25 Anything But a Card
Pile it On - #48 It's All in the Wrapping
Really Reasonable Ribbons - #13 Anything But a Card - Winter


Each year, my neighbor Diane hosts a neighborhood Christmas dinner party and I always make a gift to take to her. For this year's gift I decided to make glitter ornaments and a gift box.


Diane has three, much-loved dogs so I thought it would be fun to make the ornaments for the dogs. I used the "floor wax" technique and red Martha Stewart glitter to make the glitter ornaments. If you're not familiar with this technique ... check out this video. Using my Gypsy and Lyrical Letters, I sized and welded the letter of their names and cut them out of white vinyl. For the back of the ornaments, I cut this cute little dog using Paper Pups and the star from the Christmas Solutions cartridge. The dog's eye was too small to cut from the vinyl, so I used a paint pen to add a small dot. Each ornament is topped with a little red and white gingham ribbon from Stampin' Up.                                                     

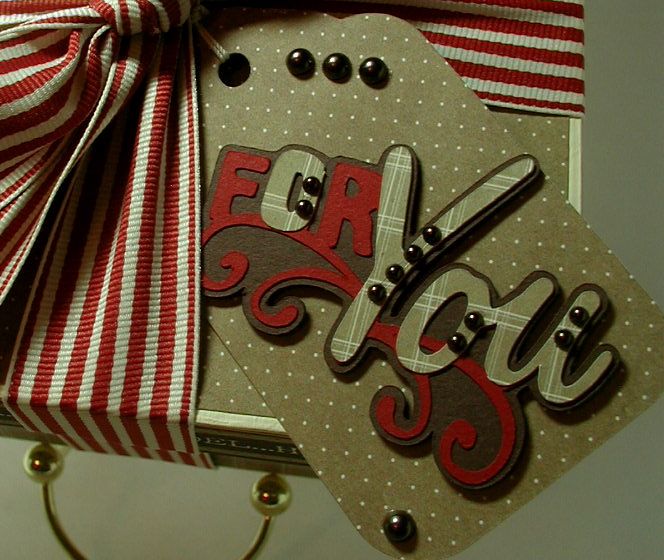
The gift box is a 6" x 6" paper mache box. I painted it with three coats of Light Buttermilk Americana acrylic paint. I used paper from the DCWV Homemade Christmas stack to cover the sides and top of the box. The red striped ribbon is also from Stampin' Up. I adhered two pieces to both the box bottom and top, making sure they 'lined up' when the top was placed on the box. I added another piece of patterned paper to the inside of the lid to hide the ends of the ribbon. For the bottom of the box, the ribbon ends are hidden by tissue paper. I then tied a big bow on the top of the lid.


The tag and phrase were cut from the Winter Frolic cartridge using more of the DCVW paper and card stock from Stampin' Up. The tag was cut at 2.5" and the phrase was cut at 2". I used pop dots to attach the phrase to the tag and added some bronze pearls.
Here's a look at the complete project. Hope you like it ... thanks for stopping by!

Tuesday, November 2, 2010

Halloween 2010

I'm a little late in posting, but here are some of the things I made for Halloween.


These are treat bags I made for the kids in my neighborhood. The images are from Mini Monsters. I sized them with my Gypsy and used the Hide/Contour feature to eliminate the placement marks for the faces. Then I used stamps from Peachy Keen to stamp their eyes and mouths.  The sentiment stamps are from My Pink Stamper and the paper is from DCVW. I also used the Martha Stewart 'Drippy Goo' punch.


I love these Peachy Keen stamps ... the little three-eyed monster face is my favorite.

For the glass block, I used vinyl and the Pumpkin Carvings cartridge. I cut a small piece of yellow vellum and layered it between the vinyl and the glass block.  Here's the back side:
Finally, I totally stole this idea from Greenbean from the Cricut Circle message board. She comes up with some of the cutest stuff ... check out her blog here.
They're glass ornaments ... the inside was coated with Martha Stewart glow-in-the-dark glitter using the 'floor wax' technique ... Joy has a great video for glitter ornaments here.
The spiders are from Doodlecharms. I added googly eyes and a little ribbon. Hope you like my projects. Now it's on to Thanksgiving!

Friday, December 25, 2009

Jessica's Gift Card Holder

My niece Jessica is a wonderful artist ... after graduation next spring, she hopes to attend college to study art. So, of course, I got her a Michael's gift card for Christmas and made this gift card holder for her. I used the elf from Hello Kitty Greetings, cut at 8 inches. I added white velvet flocking and Martha Stewart tinsel glitter to the fur trim and red velvet flocking on her hat and shoes. I used Stickles on the bow in her hair and, just for fun, hot-glued jingle bells to the tips of her shoes. On the back, I cut patterned paper using the blackout feature and adhered it to the main image. Then, using Tag, Bags, Boxes and More, I cut a little envelope for the gift card. I really like this one ... it was such fun to make!

Saturday, December 19, 2009

Christmas Bella Card


This is one of my Christmas cards for this year. I made a dozen of these for my sisters and some special 'girl friends'. The image is from Stamping Bella, colored with Stampin' Up markers. The sentiment stamp is from Stampendous. I used the George cartridge to cut the circle and rectangles, the Gypsy Wanderings cartridge for the scalloped circle and the Tag, Bags, Boxes and More cartridge for the sentiment tag. The edges were inked with Tim Holtz Distress Ink.

If you look closely, you'll see I used Martha Stewart tinsel glitter on Bella's hat and boots, and I used Martha Stewart microbeads for the holly berries. Martha has come up with some really cool bling!


For the inside, I used the Winter Woodland cartridge for the holly and Gypsy Wandering for the "Fabulous". The inside is not quite what I had in mind, but it's works. Overall, I'm happy with this one ... hope you like it too!


Saturday, December 12, 2009

Snowflake Notecard Set


My husband and I went to a neighborhood Christmas party tonight and I needed a hostess gift, so I made a set of four note cards using a snowflake (cut at 3.5 inches) from the Winter Woodland Cricut cartridge. I 'sparkled up' the snowflake with a little Martha Stewart tinsel glitter, then added doodling and some ribbon ... quick and easy.
I also stamped and embossed snowflakes on the envelopes (Stampin' Up stamp), and added three more glittered snowflakes (cut at 3.5, 3 and 2.5 inches) to decorate the gift bag. I tied the snowflakes to the gift bag with clear monofilament thread make them look as if they're floating or maybe falling.