Pages

Showing posts with label Papertrey Ink. Show all posts

Saturday, June 4, 2016

Graduation 2016


It's that time of year ... Graduation! Here's a couple of cards I've made for the graduation party season.

For Taylor:


This is a 4.25" x 5.5" card. The images are stamps from Papertrey Ink's 'Filled with Joy' stamp set ... I used a variety of Papertrey dye inks. I used a little clear Wink of Stella on the center of each of the flowers. It's hard to see in the photo, but it added a really nice shimmer. The sentiment is from one of the Close To My Heart Cricut bundle stamp sets, embossed with white embossing powder. The aperture was cut with a Nestabilities die and I used craft foam to pop up the stamped layer.  The envelope was made using piece of paper from Echo Park's Be Mine collection and the Stamping' Up Envelope Punch Board (my new favorite thing!).

For Nick:


This card is 5"x 5". The designer paper is from the DCWV 'The High School' Stack. The dark gray layer was embossed with the 'Diamond Plate' Cuttlebug folder. I stamped the light gray layer with the Stampendous '2 Grad Cap' stamp and embossed it with American Crafts Zing Pewter embossing powder, then cut it out using a Nestabilites die and popped it up using black craft foam. I finished by making an envelope with a random piece of gray textured card stock.

I'm happy with both of these and ready for the parties!!

Thanks for stopping by ...


Friday, August 26, 2011

Cricut 360° Blog Challenge #9 ... Relax

Labor Day is September 5th and over at the Cricut 360° Challenge Blog we think it's time to relax.
For my relaxing card, I chose to use my new favorite cartridge ... Art Philosophy. If you haven't seen this cartridge, I highly recommend that you check it out ... it's amazing!!

The patterned papers are from Stampin' Up, the cardstock and sentiment stamp are from Papertrey Ink, and I added some faux stitching and self-adhesive pearls.
I used some netting to make a hammock. It didn't turn out quite like I imagined, but when I showed my card to a couple of friends, they recognized it as a hammock without any prompting ... so I guess it works!

Be sure to check out all the other 'relaxing' projects at the Cricut 360° Challenge Blog ... I know you'll love them. And I hope you get a chance to play along ... I'd love to see what you create!


Thanks for stopping by ...

Friday, August 12, 2011

Cricut 360° Blog Challenge #7 ... Old West

It's Friday, and you know what that means ... another Cricut 360° Blog challenge. This week we're headed out west to find our inner cowgirl!


For my card, I chose a digital image from Bombshell Stamps. They have great vintage images and I just love this cowgirl! I used PhotoShop Elements to change the line art color from black to brown, and then used Copics to color the image.  The patterned paper is from K & Company and the cardstock is from Papertrey Ink. The frames are from the Elegant Edges cartridge ... I used my Gypsy to size the frames to fit my card base. To make the tarnished gold frame, I cut the image from a cream colored cardstock, inked it first with Brushed Corduroy Distress Ink, then with a bronze color Ink Spot and finished with a spritz of Tattered Leather Glimmer Mist. I then ran it through my crimper to give it a some dimension. My image is pop-dotted and to finish, I added a little crochet thread and a metal star I found in a old jewelry box.


I added a computer generated sentiment to the inside of the card. It's a quote from Dale Evans ... it really brings back memories of watching Roy Rogers and Dale Evans on Saturday afternoon (I'm dating myself here!) and I thought it was perfect for my vintage style card.

Now it's your turn ... mosey on over to the Cricut 360° Blog and see the great projects my design team sisters have created. I hope you're inspired to join us this week.


Thanks for stopping by ...

Wednesday, July 20, 2011

Wenching You a Happy Birthday!

Here's a quick and easy card I made 
for my brother-in-law's birthday.


I used black cardstock from Papertrey Ink to make a 5.25" square card base. Then I used my Imagine and the Buccaneer cartridge to print and cut the background paper and the cute little 'wench'. I used pop dots to adhere all her layers, and then more pop dots to attached her to the front of the card.


For the inside, I printed more of the background paper and added a computer generated sentiment. So much fun ...

I love my Imagine!!

Thanks for stopping by ...

Saturday, July 9, 2011

Pinwheel Birthday Card

Pinwheels are so popular nowadays, 
I thought I see what I could do with one. 
I started with 2.25" square, made the pinwheel, then added a button and some crochet thread. The stem and leaves were cut using the Serenade Cricut cartridge. I cut extra leaves, embossed them by hand, and pop dotted them on top of the original leaves.

The flower pot was cut from the Kate's ABCs Cricut cartridge ... this has become my favorite flower pot!  I inked the edges and pop dotted the layers.
The mat was cut from the Elegant Edges Cricut cartridge ... I inked the edges added a little faux stitching. 

My sentiment is a stamp from Verve Stamps.

The cardstock I used is from Papertrey Ink and the patterned paper is My Mind's Eye ... isn't it lovely!! Hope you like my little pinwheel card ...


Thanks for stopping by ...

Friday, July 8, 2011

Cricut 360° Blog Challenge #2 ... Thank You

 I am so excited about the response we had to our first Cricut 360° Blog challenge! It was wonderful to see everyone's entry ... you all are seriously talented. After such a great first week, it's appropriate that our next challenge is to create a 'Thank You' card. The only rules: create a circle shaped card and, of course, use your Cricut. Here's what I came up with for this week:


I got my inspiration for this card from Michele Kovack. She is one of the design team members for the Circut Circle blog and she recently did a tutorial on using your Cricut to cut felt. The trick is to stabilize your felt with Heat & Bond or Wonder Under. Then you place it, felt side down, on your mat and cut using a deep cut blade. Two more tricks: tape the edges of the felt to your mat and keep your cuts simple. The felt will shift a little, so intricate cuts won't work well.  

So, to make my card I used my Gypsy and Elegant Edges to create the base out of a cream colored cardstock. Then I cut two mats, one from a peach colored cardstock (using the shadow feature) and one from a patterned paper.  The next layer is a doily that I inked with distress ink and spritzed with Glimmer Mist. The peach is from the Preserves cartridge, cut from three colors of felt. I did some embroidery stitches to dress it up a bit and added a button to the center. My little tag is from Tag, Bag, Boxes & More and my sentiment stamps are from My Pink Stamper (You're a Peach!) and Papertrey Ink (thanks). The felt and cardstock are also from Papertrey Ink.

So, there's your challenge ... I'm really looking forward to seeing what you all create ... and remember, we'll use random.org to select our weekly winner. This week the prize is a paper pad from Echo Park. Also, you just might be chosen as one of our weekly Top 3 and be entered in our monthly giveaway. Have fun creating!!


Thanks for stopping by ...

Friday, July 1, 2011

Cricut 360° Challenge #1 ... Invitation


Yah, I'm so excited ... it's finally here ... the first challenge for the new Cricut 360° Challenge blog! To get started, we've created invitations to invite you to come and play along with us.

For my card, I used white cardstock from PaperTrey Ink to make a 6"x6" base. The frame was cut using the Elegant Edges Cricut cartridge, embossed using the Polka Dots Cuttlebug folder and then lined with some polka dot paper from Stampin' Up. The balloons and the Cricut head were cut using Cricut Decals, which is one of the 'built-in' cartridges on the Expression 2. I used my computer to print the sentiments and then inked the edges of the balloons and added crochet thread for the strings. All the images on my card are 'pop dotted' to give it some dimension.

I hope you like my little card ... now it's your turn. For more inspiration, hop on over to the Cricut 360° Challenge blog to see what the other design team members have created ... you'll be very impressed. When you get to the blog, be sure to click on the 'Rules' tab at the top of the page. That's where you'll find all you need to know about our challenges.

Wait, there's more: We have a prize this week. We will use random.org to select a winner from this week's participants. Up for grabs ...


a 6"x6" Life of the Party paper pad from Basic Grey.

And even more: each week the Design Team will pick three weekly favorites. Those selected will receive a badge to display on their blog. Then, at the end of each month the Design Team will select a monthly winner from the weekly favorites, and that winner will receive prize, too! How much fun is that!!

So, get busy ... I can't wait to see what you all make!


Thanks for stopping by ...

Sunday, April 10, 2011

A Card for Sweet Grayson


This is one of my all time favorites ... I'm so pleased with how this turned out. A sweet little card for a sweet little baby boy on his Baptism day.


I used cardstock from PaperTrey Ink to make the 5.25" square card base. The patterned paper is from Echo Park and is a very pretty, pale seafoam green ... that layer is 5" square. The white layer is 4.75" square and I embossed that with my Cuttlebug and the Polka Dots folder (it's one of the larger 5"x7" folders). I also rubbed a little soft green chalk over the embossing ... it's very subtle, so it's hard to see in the photos. The cross is from the Wedding Solutions Circut cartridge, cut at 4.5". I cut base layer from the patterned paper using the blackout feature. The top layer was cut from a white textured Bazzill paper.


The little lamb is from the Paper Doll Dress Up Circut cartridge. It was cut three times at 3". The first layer was cut from a medium shade of gray cardstock. The other two layers were cut from white cardstock. For the white layers, I used the hide contour feature on my Gypsy to eliminate the cut for the ear. On one of the white layers, I trimmed off the face, tail and hooves. On the other white layer, I trimmed off everything, leaving just the body. I ran this layer through my Xyron and then covered it with white flocking powder. To finish him, I used a black gel pen to color his eye.


The butterfly is from the Create a Critter Cricut cartridge, cut a .75". I cut two of the base layers from the medium gray cardstock, then one 'layer 1' from a light yellow cardstock. The 'layer 2' was cut from a seafoam green cardstock. Then I cut two more of the 'layer 1s' (one flipped) from the green cardstock ... I adhered the flipped one on the back of the top butterfly and the other one the top of the bottom butterfly. When I put the two butterflies together, I only adhered the bodies. This made a cute little 3D butterfly, and really, it's much easier to make than it sounds!


Now here's a look at the inside ... the sentiment is computer generated. I layered this over more of the patterned paper and added a few self-adhesive pearls. I really enjoyed making this ... hope you like it too!!

Thanks for stopping by ...

Saturday, April 9, 2011

A Belated Birthday Card

Here's another quick card I made using my Imagine. All of the papers and images are from the Imagine More Circut cartridge. I cut everything using the layers feature and I cut an extra flower so I could pop it up. The card base was made with cardstock from PaperTrey Ink and I added a few buttons, some twine and a sentiment from Verve Stamps. I'm still amazed at how quickly you can create a card with the Imagine!!

Thanks for stopping by ...

Saturday, January 1, 2011

Christmas Cards 2010


Here are few of the cards I made for Christmas 2010:


Just Because Cards
Peachy Keen Stamps
Tulip Puff Paint
DCVW Paper
PaperTrey Ink Card Stock
Martha Stewart Border Punch
Pearls and Ribbon


Winter Frolic
DCVW Paper
Stampin' Up Card Stock
PaperTrey Ink Card Stock
Stampin' Up Ribbon
Martha Stewart Glitter


Winter Frolic
DCVW Paper
Stampin' Up Card Stock
Cuttlebug Scrollwork Folder
Distress Ink
Champagne Mist Shimmer Paint
Martha Stewart Glitter
Ribbon inked with Distress Ink and Shimmer Paint

Wednesday, October 20, 2010

Country Life Thank You

I love the flower pitcher from the Country Life Cricut cartridge. This is my take on it ...

The cardstock is from Stampin' Up and the patterned paper for the background is from the DCWV Autumn Stack. I used a border punch from EK Success to edge the green checked paper.


The patterned paper for the flowers is from Cosmo Cricket. I cut  each flower three times, inked and curled the edges, then layered. Each was finished with a brown self-adhesive pearl.


The pitcher was embossed with several layers of UTEE. I added a bow and a little tag (and shadow) from Tag, Bag, Boxes and More. The sentiment is a stamp from PaperTrey Ink's Mega Mixed Messages set. I'm really happy with this one ... thanks for stopping by!

Wednesday, October 13, 2010

Think Pink


This is my entry for the "Think Pink"contest on the Circut Circle blog. It's a birthday card for my friend Lori. The challenge was to make a project using at least two Cricut cuts and
 three or more of the following elements:

Pink
Ruffles
Scallops
Flourishes
Glitter
Jewels


Supplies:

Card stock - PaperTrey Ink
Patterned paper - Stampin' Up
Cricut - Serenade Cartridge
Sentiment - My Pink Stamper 'Tweetie Hoo Puns' 
Extras - Ribbon, crepe paper (for ruffle), 
border punch (Stampin' Up), 
Distress Ink, Stickles and self-adhesive pearls.

Tuesday, September 14, 2010

Three Birds Birthday


This is one of my favorite cards and was actually quick and easy. The card base and scalloped squares (cut using the Storybook cartridge) are kraft paper. The images and sentiment were stamped using Chocolate Chip ink from Stampin Up. The scalloped squares are layered over a little gingham ribbon and placed on top of a rectangle of crimped red cardstock. I finished it with a little doodling and some bronze self-adhesive pearls.

The cardstock, image stamps and sentiment stamp are all from PaperTrey Ink.


Friday, June 25, 2010

My Pink Stamper Design Team: Summer Fun


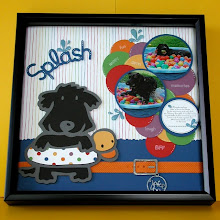
Okay, so this is a little out of my comfort zone. I'm a cardmaker, not a scrapbooker. In fact, this is the first layout I've ever done ... but the idea popped into my head and I had to go with it. This is my buddy Jake playing in his pool filled with water and brightly colored balls. Yes, Jake has his own pool ... which is just one of the reason we're known in our neighborhood as the crazy people with all those dogs!


I cut the dog, collar, buckle and tag from Paper Pups. The dog was cut with my Gypsy using the Hide/Contour feature ... which is my new favorite thing. I was able to cut the ducky floatie in three different colors without any waste. I couldn't find paper I liked for the floatie, so I used a hole punch to make polka dots from scraps of card stock and then adhered them to the white base. This was a real test of my patience ... but I like the end result.


I love how the collar, buckle and tag turned out! I used my Cuttlebug and the Herringbone folder to dry emboss the collar. The buckle and tag were cut from the cardboard from a paper stack. I inked them with silver ink and embossed them with Ultra Thick Embossing Enamel (UTEE). I attached the tag to the buckle using a couple of jewelry finds so it actually dangles ... yeah ... very proud of myself!!


The circles were cut using "George and Basic Shapes" and I used the center point key when I cut the pictures. The journaling is computer generated because it would make me crazy to try and do that by hand! Here you can also see the cute border ... it's a EK Success border punch.


 The splash is from "Create 
a Critter". I embossed the water drops with UTEE. I 
cut a few more, snipped off the water drops and embossed them to use as embellishments. 


I added sentiments using the My Pink Stamper's "Family & Friends" set and a little doodling. And, since I don't have an album for this, I framed my layout in a 12" x 12" shadow box. 


Now, hop on over to My Pink Stamper to see the other Design Team "Summer Fun" projects!!

Friday, May 28, 2010

My Pink Stamper's Father's Day Challenge

The challenge today at My Pink Stamper is to create a Father's Day project. If you submit a project, you'll be entered into drawing for a Cricut Expression ... how fun is that!
This is what I came up with:
Here are the details - 
Size: A2
Card stock: Papertrey Ink
Papers: Digitals from Pink Petticoat
Cricut: Fishing Pole and Fish from "Just Because" Cards @ 5.75"
Sentiment: Computer generated
Extras: Crochet Thread, Ric-Rac Trim, Stickles and Stampin' Up Ticket Corner punch

Monday, May 24, 2010

Congratulations, Jessica!

One more graduation card. This image is one of my absolute favorites ... it's a Stamping Bella ... colored with Prismas and OMS, then cut with Nestibilities. The blue and white ovals were sized and cut using my Gypsy and George, and the blue label is from Gypsy Wanderings. The patterned paper is from a K & Company paper pad (Black and Ivory Fusion) and the sentiment is from PaperTrey Ink's Mega Mixed Messages set. I added eyelets to the label, and finished it with some bright pink ribbon and rhinestones. Oh, and I'm sure there are some pop dots somewhere ...

Saturday, May 22, 2010

Strawberry Shaped Card - Preserves

Here's another shaped card - this time using the Preserves cartridge. I used my Gypsy for the layout and welding. The images on this cartridge layer together so nicely ... that really makes it easy to create a cute card. The card stock I used is from Stampin' Up and the sentiment stamp is from PaperTrey Ink.

Monday, May 3, 2010

My Pink Stamper - Challenge #11

Challenge # 11 is "Colors of the Rainbow". I chose to make a birthday card for my friend Bonnie. Here are the details:

Base card stock - PaperTrey Ink
Other card stock - Recollections from Michaels
Cricut - Fence and flowers from Songbird
Inside sentiment - Computer generated
Extras - MS punches, buttons, pop dots and doodling.

Here's a look at the inside:
Really, she is a good friend!!

Thursday, April 22, 2010

A Quick Thank You


Just a quick card to share with you today. The card stock is from Papertrey Ink and the patterned paper is from Basic Grey. The sentiment is a stamp from Stampin Up ... with a little self-adhesive pearl. I inked the edges of the sentiment tag and rounded the corners, then tied it all up with a pretty ribbon. So simple!!

Friday, April 16, 2010

Shaped Cards - TBBM


Earlier this week, Robyn at My Pink Stamper posted a video showing how to make a really cute shaped card using Tag, Bags, Boxes and More. You can see this video and all her other great videos here.

Basically, using Design Studio or Gypsy, you weld two tags together to create your card base. I increased the width of my tags to make my card a little wider.

My images are from the Preserves cartridge, cut at 3". I really like this cartridge ... there are some awesome images and they layer together very nicely.

The sentiment stamp for the watermelon card is from My Pink Stamper's Everyday Occasions set, and the stamp for the blueberries card is from Papertrey Ink's Mega Mixed Messages set. The papers are all from Stampin' Up.

Cute, quick and easy. Hope you like them.