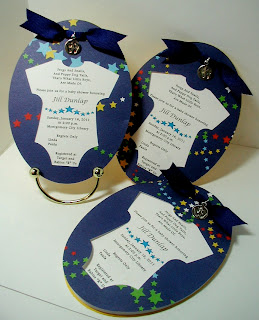
I can't take credit for this design ... it was originally done by Nancy Damiano, one of the designers from the Circut Circle blog ... but I did 'change it up' a little.
These were made using the cute Onesie on the Wrap it Up Cricut cartridge. Using my Gypsy, I eliminated the single hole; then I welded two circles from the George and Basic Shapes Cricut cartridge to the top of the shape to accommodate my ribbon.
Three layers make up each invitation: the top layer cut from designer paper using the Tag Feature, the bottom layer cut from card stock using the Tag Blackout Feature, and the center layer cut from a light-weight card stock (from the office supply section at WalMart) also using the Tag Blackout Feature. I cut the center layer just a bit smaller than the other two layers.
The layers are held together with the ribbon (no adhesive), and I added a little charm. These were actually very easy to make. I made 60 and they went together quickly. Also, they fit perfectly in an A2 size envelope .
If you're interested , you can download the Gypsy file and a Word file for the middle layer. The Gypsy file is designed so you can five images from a 12"x12" sheet of paper or card stock (for the top and bottom layers).
Word File Download
For the middle layer, the Gypsy file will cut two images from an 8.5" x 11" sheet of light-weight card stock. Lay your printed sheet on your mat as shown here.


.jpg)


3 comments:
Incredibly cute!
This is fantastic!!!!!
These are so adorable. Thank you for being so generous and sharing your creations and gypsy file.
Post a Comment