Pages

Showing posts with label Create a Critter. Show all posts

Saturday, April 16, 2011

Tulips ... It Must Be Spring!

Tulips are one of my favorite flowers and these cuties are from the Create a Critter Cricut cartridge. I used my Imagine to flood fill them with patterns from the Blossom cartridge. I inked the edges, added glitter and pop dotted the flowers. The next layer is a paper doily that I inked with Antique Linen and Peeled Paint Distress ink and some Stampin' Up Shimmer ink. The scalloped layer is from the Paper Lace Cricut cartridge. I flood filled this with a pale yellow to match the tulips and then inked those edges, too. Finished it with a satin ribbon and a little pearl trim.

Thanks for stopping by ...

Sunday, April 10, 2011

A Card for Sweet Grayson


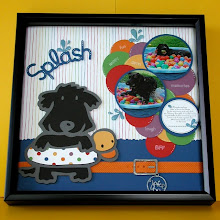
This is one of my all time favorites ... I'm so pleased with how this turned out. A sweet little card for a sweet little baby boy on his Baptism day.


I used cardstock from PaperTrey Ink to make the 5.25" square card base. The patterned paper is from Echo Park and is a very pretty, pale seafoam green ... that layer is 5" square. The white layer is 4.75" square and I embossed that with my Cuttlebug and the Polka Dots folder (it's one of the larger 5"x7" folders). I also rubbed a little soft green chalk over the embossing ... it's very subtle, so it's hard to see in the photos. The cross is from the Wedding Solutions Circut cartridge, cut at 4.5". I cut base layer from the patterned paper using the blackout feature. The top layer was cut from a white textured Bazzill paper.


The little lamb is from the Paper Doll Dress Up Circut cartridge. It was cut three times at 3". The first layer was cut from a medium shade of gray cardstock. The other two layers were cut from white cardstock. For the white layers, I used the hide contour feature on my Gypsy to eliminate the cut for the ear. On one of the white layers, I trimmed off the face, tail and hooves. On the other white layer, I trimmed off everything, leaving just the body. I ran this layer through my Xyron and then covered it with white flocking powder. To finish him, I used a black gel pen to color his eye.


The butterfly is from the Create a Critter Cricut cartridge, cut a .75". I cut two of the base layers from the medium gray cardstock, then one 'layer 1' from a light yellow cardstock. The 'layer 2' was cut from a seafoam green cardstock. Then I cut two more of the 'layer 1s' (one flipped) from the green cardstock ... I adhered the flipped one on the back of the top butterfly and the other one the top of the bottom butterfly. When I put the two butterflies together, I only adhered the bodies. This made a cute little 3D butterfly, and really, it's much easier to make than it sounds!


Now here's a look at the inside ... the sentiment is computer generated. I layered this over more of the patterned paper and added a few self-adhesive pearls. I really enjoyed making this ... hope you like it too!!

Thanks for stopping by ...

Sunday, September 19, 2010

Our Shower Gift For Sarah


I made this for a wedding shower gift. I started with three cake plates (small, medium and large) that I got from Pier One. I stacked them and used a little hot glue on their bases to keep them from sliding around. I found some brightly colored kitchen towels that I  rolled into 'cinnamon roll' shapes and placed them on the stand. I added some curly ribbon, then wrapped it all in cellophane and tied it up with lots more curly ribbon. 
The gift card is 3" x 3". I used the butterfly from the Create a Critter cartridge. I cut the base twice and attached just the bodies together to give it a 3D look. The sentiment is a Whiff of Joy stamp.


Friday, June 25, 2010

My Pink Stamper Design Team: Summer Fun


Okay, so this is a little out of my comfort zone. I'm a cardmaker, not a scrapbooker. In fact, this is the first layout I've ever done ... but the idea popped into my head and I had to go with it. This is my buddy Jake playing in his pool filled with water and brightly colored balls. Yes, Jake has his own pool ... which is just one of the reason we're known in our neighborhood as the crazy people with all those dogs!


I cut the dog, collar, buckle and tag from Paper Pups. The dog was cut with my Gypsy using the Hide/Contour feature ... which is my new favorite thing. I was able to cut the ducky floatie in three different colors without any waste. I couldn't find paper I liked for the floatie, so I used a hole punch to make polka dots from scraps of card stock and then adhered them to the white base. This was a real test of my patience ... but I like the end result.


I love how the collar, buckle and tag turned out! I used my Cuttlebug and the Herringbone folder to dry emboss the collar. The buckle and tag were cut from the cardboard from a paper stack. I inked them with silver ink and embossed them with Ultra Thick Embossing Enamel (UTEE). I attached the tag to the buckle using a couple of jewelry finds so it actually dangles ... yeah ... very proud of myself!!


The circles were cut using "George and Basic Shapes" and I used the center point key when I cut the pictures. The journaling is computer generated because it would make me crazy to try and do that by hand! Here you can also see the cute border ... it's a EK Success border punch.


 The splash is from "Create 
a Critter". I embossed the water drops with UTEE. I 
cut a few more, snipped off the water drops and embossed them to use as embellishments. 


I added sentiments using the My Pink Stamper's "Family & Friends" set and a little doodling. And, since I don't have an album for this, I framed my layout in a 12" x 12" shadow box. 


Now, hop on over to My Pink Stamper to see the other Design Team "Summer Fun" projects!!

Thursday, May 27, 2010

My Pink Stamper Design Team Project - Family


The design team theme for May at My Pink Stamper is "Family". My husband and I both have large families ... he's the second of eight children and I'm the youngest of six. So I thought I would make a calendar/card holder to help keep track of everyone's special days. This is actually a very quick and easy project ... I'm sure I'll be making more of these for gifts!

I used the Card Organizer tutorial from Splitcoast Stampers ... look for it here, and the calendar is a PDF file ... you can find it here.


The details -

Size: Front and back covers 6.25" x 8", inside pages 6" x 7.75"
Paper: 12" x 12" double sided paper and coordinating card stock from Stampin' Up
Cricut: Owl and branch from 'Create a Critter' 
Sentiment: Stamps from My Pink Stamper's Everyday Occasions and Simply Sweet Occasions sets; stamped with Versa Mark
Extras: Ribbon, Cuttlebug and embossing folders, computer generated calendar, Bind-it-All


Now, head on over to My Pink Stamper to see what my design team sisters have come up with ... their "Family" projects are AWESOME!!

Monday, May 17, 2010

Congratulations to Dr. Rachel Ray!

Rachel and my daughter were roommates in college ... Rachel went on to Vet School and she received her degree last Friday. Very exciting! My daughter asked me to make this for her. All the animals were cut at 1.5" using 'Create a Critter'. I was a little worried about cutting them that small, but it all worked out ... I wouldn't, however, go much smaller. I used my Gypsy to lay this all out and was able to get everything except the sentiment on one mat so, once I got all the paper in place, the cutting was a breeze.

Here are the details:
Size - 5.25" x 5.25"
Papers - Martha Stewart 'Playful Blue' stack for the mats, the animals were all cut using scraps (yeah!)
Cricut - Create a Critter, Storybook (mats) and Plantin Schoolbook (font)
Extras - Stickles, a little ribbon and lots of pop dots

Wednesday, May 5, 2010

Nuts About You

Another Punny-licious card. These Create a Critter images layer very nicely ... super easy!

Size: 4" x 6"
Base cardstock: Stampin' Up
Other cardstock: Recollecti
ons from Michaels
Patterned paper: Yellow from Stampin' Up, all others from Cosmo Cricket 'Earth Love'
Cricut: Acorn (3.33 x 5.77) and Squirrel (2.95 x 2.77) from Create a Critter, sized and cut using Gypsy
Sentiment: Punny-lici
ous from My Pink Stamper
Extras: Ribbon, adhesive backed pearls, pop dots, and Tim Holt Distressed Ink in Brushed Corduroy.

Tuesday, May 4, 2010

What's Up Giraffe

I had the opportunity to make a few cards using one of My Pink Stamper's new stamp sets. The set is called Punny-licious ... very cute and works perfectly with the Create a Critter cartridge. The stamps are available at Hallmark Scrapbook and Custom Crops.

Card Size: 4" x 6"
Cardstock: Stampin' Up
Patterned Paper: digital, from Designer Digitals
Cricut: giraffe from Create a Critter, cut at 4.75"
Sentiment: Punny-lici
ous from My Pink Stamper
Extras: Ribbon, pop dots, buttons, and embroidery thread