Pages

Showing posts with label Cuttlebug. Show all posts

Saturday, June 4, 2016

Graduation 2016


It's that time of year ... Graduation! Here's a couple of cards I've made for the graduation party season.

For Taylor:


This is a 4.25" x 5.5" card. The images are stamps from Papertrey Ink's 'Filled with Joy' stamp set ... I used a variety of Papertrey dye inks. I used a little clear Wink of Stella on the center of each of the flowers. It's hard to see in the photo, but it added a really nice shimmer. The sentiment is from one of the Close To My Heart Cricut bundle stamp sets, embossed with white embossing powder. The aperture was cut with a Nestabilities die and I used craft foam to pop up the stamped layer.  The envelope was made using piece of paper from Echo Park's Be Mine collection and the Stamping' Up Envelope Punch Board (my new favorite thing!).

For Nick:


This card is 5"x 5". The designer paper is from the DCWV 'The High School' Stack. The dark gray layer was embossed with the 'Diamond Plate' Cuttlebug folder. I stamped the light gray layer with the Stampendous '2 Grad Cap' stamp and embossed it with American Crafts Zing Pewter embossing powder, then cut it out using a Nestabilites die and popped it up using black craft foam. I finished by making an envelope with a random piece of gray textured card stock.

I'm happy with both of these and ready for the parties!!

Thanks for stopping by ...


Friday, September 30, 2011

Cricut 360° Blog Challenge #13 ... Welcome Baby

Happy Friday everyone, it's time for another challenge at the Cricut 360° Blog. This week we're making something for babies.
My card this week is sweet and simple. The image was cut from the Wrap it Up cartridge and embossed with the Love Language embossing folder. I coated the wheels and trim with Glossy Accents and added ribbon, twine and buttons.

I hope you'll join us for this challenge ... I'd love to see what you create!


Thanks for stopping by ...

Friday, August 5, 2011

Cricut 360° Blog Challenge #6 ... Refreshing

It's Friday and time for another Cricut 360° Blog challenge. It's been crazy hot so we're going to try to cool things down with some refreshing projects!

For my project, I tried to recreate one of my favorite things: an Olive Garden Italian Margarita. My, oh my ... they are yummy!


There are martini glasses on a couple of Cricut cartridges, but no margarita glasses, so I used my Gypsy to make my own. I welded an oval from Plantin Schoolbook to the top of the martini glass from Smiley Cards to create the margarita shape. I cut it two times, one from white cardstock and one from frosted Shrinky Dink material. I used a Copic marker to ink the frosted side. It's kind of hard to tell from the picture, but I inked the stem of the glass with a light blue Copic marker. I used Glossy Accents to adhere some clear Martha Stewart micro beads to the rim. Then I used more Glossy Accents (just on the side edges) to adhere the Shrinky Dink layer to the card stock layer.


I like my margaritas 'on the rocks', so I used more the of Shrinky Dink material to make ice cubes. The rounded squares are from George and Basic Shapes. I used my Gypsy to weld three together to form a base. Then I cut three separately. I inked the frosted sides with a light blue Copic marker, and then embossed them with the Tiny Mosaic Cuttlebug folder. I used clear dimensional dots to attach them to the base and slipped them in between the Shrinky Dink material and the cardstock. I like how they look like they're floating. Of course, every margarita needs a straw ... I used a pipe cleaner (slipped behind the white cardstock) to make mine!


The orange slice is from Preserves. It looked a little flat, so I glossed it up with a thin coat of Glossy Accents. For my sentiment, I used Thickers from American Crafts. They're actually yellow, so I inked them with the same Copic marker I used on the margarita.


Oh, and I guess I should tell you my card is a 6" x 6" square and the designer paper is from Stampin' Up. I hope you join us for this week's challenge ... I'd love to see your refreshing ideas!!


Thanks for stopping by ...

Friday, July 22, 2011

Cricut 360 Blog Challenge #4 ... The Great Outdoors

Wow, it's hard to believe we're already up to Challenge #4 ... time is just flying by. I've really enjoyed seeing everyone's entries ... they are a great source of inspiration for me ... thanks to you all.

 Are you ready for  more? I hope you'll join us this week because we're are going "Outdoors" at the Cricut 360° Challenge Blog.
One of my favorite outdoor activities is gardening, so I made my card with that in mind. I started with this sweet little image from Mo Manning that I colored with Copics. I wanted this image to be the focal point of my card, so I kept the mats and embellishments simple. The tools were cut from the Walk in My Garden Cricut cartridge. I cut the first layers from gray cardstock, inked the edges with Tim Holtz distress ink (Black Soot) and then embossed them with UTEE ... leaving the handle portion un-embossed. I cut the second layers from brown cardstock, spritzed them with Glimmer Mist (Tattered Leather), and then embossed them with the Herringbone Cuttlebug folder. Then I finished with some twine and a sentiment stamp from Pink By Design.

Hope you like this ... can't wait to see what you design!!

And remember, we always have a weekly winner ... up for grabs this week:


Thanks for stopping by ...

Friday, July 1, 2011

Cricut 360° Challenge #1 ... Invitation


Yah, I'm so excited ... it's finally here ... the first challenge for the new Cricut 360° Challenge blog! To get started, we've created invitations to invite you to come and play along with us.

For my card, I used white cardstock from PaperTrey Ink to make a 6"x6" base. The frame was cut using the Elegant Edges Cricut cartridge, embossed using the Polka Dots Cuttlebug folder and then lined with some polka dot paper from Stampin' Up. The balloons and the Cricut head were cut using Cricut Decals, which is one of the 'built-in' cartridges on the Expression 2. I used my computer to print the sentiments and then inked the edges of the balloons and added crochet thread for the strings. All the images on my card are 'pop dotted' to give it some dimension.

I hope you like my little card ... now it's your turn. For more inspiration, hop on over to the Cricut 360° Challenge blog to see what the other design team members have created ... you'll be very impressed. When you get to the blog, be sure to click on the 'Rules' tab at the top of the page. That's where you'll find all you need to know about our challenges.

Wait, there's more: We have a prize this week. We will use random.org to select a winner from this week's participants. Up for grabs ...


a 6"x6" Life of the Party paper pad from Basic Grey.

And even more: each week the Design Team will pick three weekly favorites. Those selected will receive a badge to display on their blog. Then, at the end of each month the Design Team will select a monthly winner from the weekly favorites, and that winner will receive prize, too! How much fun is that!!

So, get busy ... I can't wait to see what you all make!


Thanks for stopping by ...

Friday, May 27, 2011

Tic Tac Toe Challenge & Cricut 360 DT Call

This card is doing double-duty ... I'm submitting it for the Tic Tac Toe Challenge on the Cricut Circle blog and also for the Cricut 360 design team call.

For the challenge, there is a Tic Tac Toe board with a design element in each of the squares. You get to choose a row and then incorporate the three elements in your project. I chose the bottom row ... use a flower shape cut, use a Cuttlebug embossing folder, and use the Imagine for your patterned paper. 

For the design team call, the requirements are to create a layout or card using lime green and a bug. Click here to find out more about this new challenge blog.


All the images were printed and cut with my Imagine, using the Blast Off cartridge. The flower pot is from Kate's ABCs, the flowers and leaves are from Mother's Day Bouquet, the butterfly is from Ashlyn's Alphabet, and the mat is one of the stock shapes from the Imagine.


For the butterfly, I printed a pattern on cardstock for the the base and then printed a solid color on vellum for the wings. I attached just the 'body' of the vellum layer to the base to create a little dimension.


I embossed the leaves with the D'Vine Swirl Cuttlebug folder and spritzed the flowers and leaves with Pearl Glimmer mist.

I love how bright and cheerful this is ... hope you like it, too!


Thanks for stopping by ...

Friday, April 22, 2011

A Happy 5th Birthday to Cricut

Provo Craft is having a layout challenge to go along with the launch of their new Expression 2. The launch is scheduled for  April 26th on HSN. They're giving away 5 of the new machines and also showcasing some of the entires. The challenge was to create a 12"x12" layout with a birthday theme, and you could enter up to three layouts. I decided to give it a try ... here are my two entries:


For this one, I used my Imagine and the Elise cartridge to print the patterned paper and the cream colored paper for the squares. I embossed cream colored squares with the Number Collage Cuttlebug folder. The lettering is from the Lyrical Letters Cricut cartridge ... sized and welded with my Gypsy. The cupcake is from the Simply Charmed Cricut cartridge. I crimped the wrapper and pop dotted the layers.


And for this one, I used Gypsy Wanderings for the 'Happy Birthday' and Plantin Schoolbook for the '5'. The 'th' are stickers from American Crafts and all the patterned papers are from Stampin' Up. It's hard to see in the pictures, but there's lots of stitching and I used a Martha Stewart border punch on the mats. I finished with some ribbon and lots of buttons.


I've only done a few layouts and wasn't really sure what I was doing, but for the most part, I'm happy with the way these turned out. I have little expectation of winning, but I really did enjoy making these ... and who knows, maybe I'll get to catch a glimpse of one of them on HSN.


Thanks for stopping by ...

Sunday, April 10, 2011

A Card for Sweet Grayson


This is one of my all time favorites ... I'm so pleased with how this turned out. A sweet little card for a sweet little baby boy on his Baptism day.


I used cardstock from PaperTrey Ink to make the 5.25" square card base. The patterned paper is from Echo Park and is a very pretty, pale seafoam green ... that layer is 5" square. The white layer is 4.75" square and I embossed that with my Cuttlebug and the Polka Dots folder (it's one of the larger 5"x7" folders). I also rubbed a little soft green chalk over the embossing ... it's very subtle, so it's hard to see in the photos. The cross is from the Wedding Solutions Circut cartridge, cut at 4.5". I cut base layer from the patterned paper using the blackout feature. The top layer was cut from a white textured Bazzill paper.


The little lamb is from the Paper Doll Dress Up Circut cartridge. It was cut three times at 3". The first layer was cut from a medium shade of gray cardstock. The other two layers were cut from white cardstock. For the white layers, I used the hide contour feature on my Gypsy to eliminate the cut for the ear. On one of the white layers, I trimmed off the face, tail and hooves. On the other white layer, I trimmed off everything, leaving just the body. I ran this layer through my Xyron and then covered it with white flocking powder. To finish him, I used a black gel pen to color his eye.


The butterfly is from the Create a Critter Cricut cartridge, cut a .75". I cut two of the base layers from the medium gray cardstock, then one 'layer 1' from a light yellow cardstock. The 'layer 2' was cut from a seafoam green cardstock. Then I cut two more of the 'layer 1s' (one flipped) from the green cardstock ... I adhered the flipped one on the back of the top butterfly and the other one the top of the bottom butterfly. When I put the two butterflies together, I only adhered the bodies. This made a cute little 3D butterfly, and really, it's much easier to make than it sounds!


Now here's a look at the inside ... the sentiment is computer generated. I layered this over more of the patterned paper and added a few self-adhesive pearls. I really enjoyed making this ... hope you like it too!!

Thanks for stopping by ...

Wednesday, January 19, 2011

Going Buggy Challenge Card

Have you heard, Enfys had a big party on her blog last week. Lots of fun things to do and prizes, too. It's not too late to join in ... just click on the link at the top of my sidebar.
On day one, Enfys challenged us to Go Buggy and create a card with a bug on it. This is what I came up with. For my card, I chose one of my all-time favorite cuts from the Wild Card cartridge. I cut four of the petal layers and four of the leaves, inked the edges with Distress Ink and curled the petals.  I attached all the layers using clear Zot Dots to add some dimension. For the center of my flower, I cut a circle from the George and Basic Shapes cartridge, embossed it with my Cuttlebug and then inked it with Champagne Mist Shimmer Paint.

Now, for my bugs, I chose the Ladybug cut from the 'Just Because' Cards cartridge. I inked the bodies with a bit of shimmer paint and embossed the wings with UTEE. I think that makes them look at a little more realistic and not so flat. I also added some self-adhesive pearls to the Ladybugs and the card base.

Here's a side view to show the dimension of the layers ...

and a peek at the inside. The sentiment is a stamp from My Pink Stamper's Fruit & Veggie Puns set and all the papers are from Stampin' Up. I had a lot of fun "Going Buggy" at Enfys' blog party ... hope you do, too!

Entered in the following challenges:
Going Buggy Blog Party - Add a Bug
2 Sisters - Flowers
Fairy Tale - Flowers
Stamp Insanity - Let it All Hang Out
MelJen's Designs - Square or Round
Pile it On - Anything Goes

Monday, September 20, 2010

Cheers to You

My daughter needed a Wedding Shower card ... this is what I came up with:

It's a A2 size card. The cardstock is from Stampin' Up. The patterned paper is from K & Company, embossed using the Grace's Frame Cuttlebug folder. The flutes are from the Tie the Knot cartridge, cut at 3.75". I added stickles for the champagne and self-adhesive pearls for the bubbles. 

Monday, September 13, 2010

Golfer's Birthday Card

I used my Gypsy and the George and Basic Shapes cartidge to create the golf club and ball. I used Cuttlebug folders to dry emboss the golf ball and the golf club head & handle. I also embossed the golf club head with UTEE.
The grass was made using a Martha Stewart punch and the sentiments are from Verve Stamps.

Friday, June 25, 2010

My Pink Stamper Design Team: Summer Fun


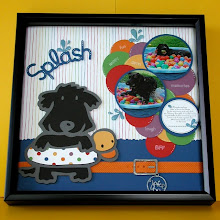
Okay, so this is a little out of my comfort zone. I'm a cardmaker, not a scrapbooker. In fact, this is the first layout I've ever done ... but the idea popped into my head and I had to go with it. This is my buddy Jake playing in his pool filled with water and brightly colored balls. Yes, Jake has his own pool ... which is just one of the reason we're known in our neighborhood as the crazy people with all those dogs!


I cut the dog, collar, buckle and tag from Paper Pups. The dog was cut with my Gypsy using the Hide/Contour feature ... which is my new favorite thing. I was able to cut the ducky floatie in three different colors without any waste. I couldn't find paper I liked for the floatie, so I used a hole punch to make polka dots from scraps of card stock and then adhered them to the white base. This was a real test of my patience ... but I like the end result.


I love how the collar, buckle and tag turned out! I used my Cuttlebug and the Herringbone folder to dry emboss the collar. The buckle and tag were cut from the cardboard from a paper stack. I inked them with silver ink and embossed them with Ultra Thick Embossing Enamel (UTEE). I attached the tag to the buckle using a couple of jewelry finds so it actually dangles ... yeah ... very proud of myself!!


The circles were cut using "George and Basic Shapes" and I used the center point key when I cut the pictures. The journaling is computer generated because it would make me crazy to try and do that by hand! Here you can also see the cute border ... it's a EK Success border punch.


 The splash is from "Create 
a Critter". I embossed the water drops with UTEE. I 
cut a few more, snipped off the water drops and embossed them to use as embellishments. 


I added sentiments using the My Pink Stamper's "Family & Friends" set and a little doodling. And, since I don't have an album for this, I framed my layout in a 12" x 12" shadow box. 


Now, hop on over to My Pink Stamper to see the other Design Team "Summer Fun" projects!!

Saturday, May 22, 2010

Strawberry Shaped Card - Preserves

Here's another shaped card - this time using the Preserves cartridge. I used my Gypsy for the layout and welding. The images on this cartridge layer together so nicely ... that really makes it easy to create a cute card. The card stock I used is from Stampin' Up and the sentiment stamp is from PaperTrey Ink.

Saturday, April 10, 2010

Happy Saturday everyone! The challenge today at My Pink Stamper is to create something using the colors pink, green and black. This is what I did:
I started by making an A2 size card from a piece of double sided card stock. I trimmed the edge using a Martha Stewart border punch and lined the punched edge with a strip of black card stock to give it a little contrast. The image is from the Walk in My Garden Cricut cartridge. Using the card feature, I cut the daisy card and the daisy layer at 5.5". I trimmed the card to 3" x 3.75" and then embossed it with my Cuttlebug and the Swiss Dots folder. I attached the daisy layer with a brad and then matted it all on a piece of black card stock. My sentiment is from Penny Black, stamped on a 2.25" x 1.25" piece of card stock, also matted on black card stock. I adhered both layers to my card base with pop dots and then tied on a black ribbon. To finish, I punched leaves from two shades of green card stock (another Martha punch) and tucked them in around the daisy. Hope you like my card ... now it's your turn. Have fun!

Saturday, March 6, 2010

My Simple Shoe Card

A quick little card: the shoe is from Gypsy Wanderings. I embossed the card stock with clear embossing powder, then ran it through my Cuttlebug. The patterned paper is a digital from Designer Digitals. I added a little ribbon and some big bling. Easy-peasy!!


The sentiment is a stamp from Papertrey Ink's
Mega Mixed Messages set.


Wednesday, February 24, 2010

I Love The Home Decor Cupcake

I've entered this in the Ribbon-Tastic challenge at
This is such a great cut ... it always turns out looking impressive.

I ran the pink paper through my crimper to make it look like a cupcake paper, then I Cuttlebugged and glittered the 'frosting'. To top it off, I embossed the cherry with clear embossing powder to give it a little shine. Then I finished it with some stitching and a pretty ribbon ... quick and simple.

Here's a look at the inside. The tag is a cut from Tags, Bags, Boxes and More and the sentiment stamps are from my new favorite Stampin' Up set.

Tuesday, February 23, 2010

April's Birthday and Peachy Keen Challenge 23

This is a card for my friend April. It also happens to work for the current challenge at Peachy Keen. The image is a stamp from Peachy Keen, colored with Twinkling H2Os. This is my first project with Twinklings and I really think I'm going to like them. The colors are so shimmery ... my photos really don't do them justice!

My yellow cardstock layer was embossed with the Cuttlebug Argyle folder and my image was cut and embossed using a Nestibilities.

The sentiment stamp is from Stampin' Up and I added a little ribbon and a little bling.

Friday, November 27, 2009

Happy Birthday Cupcake


Here's a quick little card I made for my friend Karen. The cupcake is from Home Decor, flipped and welded. I used my Gypsy ... I don't have Design Studio, so this is the first time I've made a shaped card. I can see myself doing more of these. The frosting layer was run through my cuttlebug and I used some Crystal Accents on the cherry for a little shine. Then I added a little ribbon because, well because I just have to. Pretty simple, but I like how it turn out.