Pages

Friday, July 29, 2011

Cricut 360° Blog Challenge #5 ... Transportation

Happy Friday!! Are you ready for another Cricut 360° Blog challenge? This week we're celebrating vacations and all the ways people travel to get to their favorite destinations.


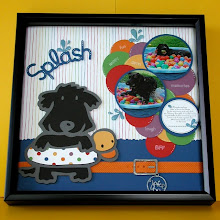
For my project, I made an A2 size card from navy blue cardstock. Then I used one of the built-in shapes on my Imagine, filled with a pattern from the Buccaneer cartridge, to create the mat. The life preserver and the anchor are from the Life's a Beach cartridge ... they were also filled with colors from Buccaneer and cut with my Imagine. I added lots of inking, a spritz of Pearl Glimmer Mist and some doodling.


The sentiment is computer generated. I hand cut the banner, inked the edges and then formed it around a pen to give it a little dimension. 

I hope my little card has inspired you to join our challenge this week ... I'd love to see what you design.


And remember, we always have a weekly give-away.
This week's  prize is a 6" x 6" Basic Grey paper pad.


Thanks for stopping by ...

Friday, July 22, 2011

Cricut 360 Blog Challenge #4 ... The Great Outdoors

Wow, it's hard to believe we're already up to Challenge #4 ... time is just flying by. I've really enjoyed seeing everyone's entries ... they are a great source of inspiration for me ... thanks to you all.

 Are you ready for  more? I hope you'll join us this week because we're are going "Outdoors" at the Cricut 360° Challenge Blog.
One of my favorite outdoor activities is gardening, so I made my card with that in mind. I started with this sweet little image from Mo Manning that I colored with Copics. I wanted this image to be the focal point of my card, so I kept the mats and embellishments simple. The tools were cut from the Walk in My Garden Cricut cartridge. I cut the first layers from gray cardstock, inked the edges with Tim Holtz distress ink (Black Soot) and then embossed them with UTEE ... leaving the handle portion un-embossed. I cut the second layers from brown cardstock, spritzed them with Glimmer Mist (Tattered Leather), and then embossed them with the Herringbone Cuttlebug folder. Then I finished with some twine and a sentiment stamp from Pink By Design.

Hope you like this ... can't wait to see what you design!!

And remember, we always have a weekly winner ... up for grabs this week:


Thanks for stopping by ...

Wednesday, July 20, 2011

Wenching You a Happy Birthday!

Here's a quick and easy card I made 
for my brother-in-law's birthday.


I used black cardstock from Papertrey Ink to make a 5.25" square card base. Then I used my Imagine and the Buccaneer cartridge to print and cut the background paper and the cute little 'wench'. I used pop dots to adhere all her layers, and then more pop dots to attached her to the front of the card.


For the inside, I printed more of the background paper and added a computer generated sentiment. So much fun ...

I love my Imagine!!

Thanks for stopping by ...

Friday, July 15, 2011

Cricut 360° Blog Challenge #3 ... For Parents

Once again, I am absolutely amazed at the reponse we had for Challenge #2 ... are you ready for Challenge #3 from the Cricut 360° Blog? Well, July 24th is Parents' Day and we're making projects in honor of moms and dads everywhere.


For my project, I started with a small, inexpensive frame ... the inside dimensions are about 4" x 11". I removed the glass and covered the backing with some patterned paper from Michael's. Then, using quick dry glue, I added  a crocheted trim to the inside edge.


I then selected word art from several cartridges and used my Imagine to print and cut. All of the papers were printed from the Imagine More cartridge. For each word, I selected a pattern and solid paper. Both printed and then cut at the same size. All the edges were inked using a coordinating Stampin' Up marker. I off-set the solid paper to create a shadow effect. Each word is pop-dotted ... they kind of look like they're floating! I finished by adding self-adhesive pearls to the background and the edge of the frame.


At that point, I thought it needed a little something else, so I decided to add a flower. I used the Mother's Day Bouquet cartridge and Imagine More patterns for the flower petals and leaves. Those were inked, as well, and I added a pearl, some crinkle ribbon, crochet trim and a little copper wire to finish. I'm really happy with this little flower. If you haven't tried making flowers with the Mother's Day Bouquet cartridge ... you're missing out!!

Here are the cartridges I used for the word art:

Family - Gypsy Wanderings cut @ 2.3
Together - Graphically Speaking cut @ 1.8
Forever - Home Decor cut @ 2.4
Love - Beyond Birthdays cut @ 1.4

Oh, I almost forgot ... everything was spritzed with Pearl Glimmer Mist ... for just a little sparkle!


Now it's your turn ... for our random drawing this week we have an Echo Park 'Dots and Stripes' paper pad. Good Luck!!


Thanks for stopping by ...

Saturday, July 9, 2011

Pinwheel Birthday Card

Pinwheels are so popular nowadays, 
I thought I see what I could do with one. 
I started with 2.25" square, made the pinwheel, then added a button and some crochet thread. The stem and leaves were cut using the Serenade Cricut cartridge. I cut extra leaves, embossed them by hand, and pop dotted them on top of the original leaves.

The flower pot was cut from the Kate's ABCs Cricut cartridge ... this has become my favorite flower pot!  I inked the edges and pop dotted the layers.
The mat was cut from the Elegant Edges Cricut cartridge ... I inked the edges added a little faux stitching. 

My sentiment is a stamp from Verve Stamps.

The cardstock I used is from Papertrey Ink and the patterned paper is My Mind's Eye ... isn't it lovely!! Hope you like my little pinwheel card ...


Thanks for stopping by ...

Friday, July 8, 2011

Cricut 360° Blog Challenge #2 ... Thank You

 I am so excited about the response we had to our first Cricut 360° Blog challenge! It was wonderful to see everyone's entry ... you all are seriously talented. After such a great first week, it's appropriate that our next challenge is to create a 'Thank You' card. The only rules: create a circle shaped card and, of course, use your Cricut. Here's what I came up with for this week:


I got my inspiration for this card from Michele Kovack. She is one of the design team members for the Circut Circle blog and she recently did a tutorial on using your Cricut to cut felt. The trick is to stabilize your felt with Heat & Bond or Wonder Under. Then you place it, felt side down, on your mat and cut using a deep cut blade. Two more tricks: tape the edges of the felt to your mat and keep your cuts simple. The felt will shift a little, so intricate cuts won't work well.  

So, to make my card I used my Gypsy and Elegant Edges to create the base out of a cream colored cardstock. Then I cut two mats, one from a peach colored cardstock (using the shadow feature) and one from a patterned paper.  The next layer is a doily that I inked with distress ink and spritzed with Glimmer Mist. The peach is from the Preserves cartridge, cut from three colors of felt. I did some embroidery stitches to dress it up a bit and added a button to the center. My little tag is from Tag, Bag, Boxes & More and my sentiment stamps are from My Pink Stamper (You're a Peach!) and Papertrey Ink (thanks). The felt and cardstock are also from Papertrey Ink.

So, there's your challenge ... I'm really looking forward to seeing what you all create ... and remember, we'll use random.org to select our weekly winner. This week the prize is a paper pad from Echo Park. Also, you just might be chosen as one of our weekly Top 3 and be entered in our monthly giveaway. Have fun creating!!


Thanks for stopping by ...

Friday, July 1, 2011

Cricut 360° Challenge #1 ... Invitation


Yah, I'm so excited ... it's finally here ... the first challenge for the new Cricut 360° Challenge blog! To get started, we've created invitations to invite you to come and play along with us.

For my card, I used white cardstock from PaperTrey Ink to make a 6"x6" base. The frame was cut using the Elegant Edges Cricut cartridge, embossed using the Polka Dots Cuttlebug folder and then lined with some polka dot paper from Stampin' Up. The balloons and the Cricut head were cut using Cricut Decals, which is one of the 'built-in' cartridges on the Expression 2. I used my computer to print the sentiments and then inked the edges of the balloons and added crochet thread for the strings. All the images on my card are 'pop dotted' to give it some dimension.

I hope you like my little card ... now it's your turn. For more inspiration, hop on over to the Cricut 360° Challenge blog to see what the other design team members have created ... you'll be very impressed. When you get to the blog, be sure to click on the 'Rules' tab at the top of the page. That's where you'll find all you need to know about our challenges.

Wait, there's more: We have a prize this week. We will use random.org to select a winner from this week's participants. Up for grabs ...


a 6"x6" Life of the Party paper pad from Basic Grey.

And even more: each week the Design Team will pick three weekly favorites. Those selected will receive a badge to display on their blog. Then, at the end of each month the Design Team will select a monthly winner from the weekly favorites, and that winner will receive prize, too! How much fun is that!!

So, get busy ... I can't wait to see what you all make!


Thanks for stopping by ...