Pages

Showing posts with label Lyrical Letters. Show all posts

Friday, August 19, 2011

Cricut 360° Blog Challenge #8 ... Back To School


Happy Friday! Here's my project for this week's Cricut 360° Blog challenge ... where we're headed "Back To School".
For my project, I decided to alter a notebook. I started with an inexpensive composition book and covered it with paper I printed using my Imagine and the Imagine More cartridge. Then I used my Gypsy with George & Basic Shapes to make the chalkboard frame and backed it with black cardstock. The font is from Lyrical Letters ... sized and welded with my Gypsy.
I added some frosted gems (from Martha Stewart), lots of ribbon and a cute little owl charm.
Of course, I needed an apple, so I went with the apple and books from Hello Kitty ... sometimes I forget what a versatile cartridge this is!

So, there you have it! Now it's you're turn ... head on over to the Cricut 360° Blog and show us your "Back To School" stuff!!

Thanks for stopping by ...

Monday, May 16, 2011

Frank Got a New Boat!!


My husband, Frank, got a new boat this spring ... this was a really big deal really around our house! I used my Cricut and vinyl to cut the registration numbers (that go along the sides) and then Frank decided I should 'dress up' the back of the boat, too! Love it ... another reason to play with vinyl!

I used my Gypsy to lay this out and weld the letters. The font for the names is from the Lyrical Letters Cricut cartridge and the other font is from the George and Basic Shapes Cricut cartridge. Now, I was going to leave it at that, but Frank suggested adding a little fishing pole and make it look like an exclamation point. Who knew he could be so creative!? This pole is from the Simply Charmed Cricut cartridge and is actually pretty realistic looking. I thought it needed a little something else, so I added the bobber. I made the bobber by welding shapes from the George cartridge ... I'm really proud of that little bobber ... it's my favorite part of this!!


Here's the story about the other name on the boat: Tatum is the 4 year old grandson of one of Frank's fishing buddies. Tatum is just a sweetie and he adores Frank. Now we're not quite sure what Frank said to him, or when he said it (because Frank talked about this boat for months!), but apparently he told Tatum something about having to save money so he could get a new boat. Well, a few weeks before we got the boat, Tatum's mom stopped by our house with a dollar and instructions to give that dollar to Frankie 'cause he needed money for his new boat ... too cute! We figure this makes him a co-owner, so his name is on the boat, too!!


Thanks for stopping by ..

Friday, April 22, 2011

A Happy 5th Birthday to Cricut

Provo Craft is having a layout challenge to go along with the launch of their new Expression 2. The launch is scheduled for  April 26th on HSN. They're giving away 5 of the new machines and also showcasing some of the entires. The challenge was to create a 12"x12" layout with a birthday theme, and you could enter up to three layouts. I decided to give it a try ... here are my two entries:


For this one, I used my Imagine and the Elise cartridge to print the patterned paper and the cream colored paper for the squares. I embossed cream colored squares with the Number Collage Cuttlebug folder. The lettering is from the Lyrical Letters Cricut cartridge ... sized and welded with my Gypsy. The cupcake is from the Simply Charmed Cricut cartridge. I crimped the wrapper and pop dotted the layers.


And for this one, I used Gypsy Wanderings for the 'Happy Birthday' and Plantin Schoolbook for the '5'. The 'th' are stickers from American Crafts and all the patterned papers are from Stampin' Up. It's hard to see in the pictures, but there's lots of stitching and I used a Martha Stewart border punch on the mats. I finished with some ribbon and lots of buttons.


I've only done a few layouts and wasn't really sure what I was doing, but for the most part, I'm happy with the way these turned out. I have little expectation of winning, but I really did enjoy making these ... and who knows, maybe I'll get to catch a glimpse of one of them on HSN.


Thanks for stopping by ...

Sunday, December 12, 2010

For the Dogs

This was entered in the following challenges:

Circut Circle Blog - December Challenge
Fantabulous Cricut Challenge Blog - #39 Gifts Galore
Frosted Designs - Ribbon
Fussy & Fancy  Friday Challenge - #25 Anything But a Card
Pile it On - #48 It's All in the Wrapping
Really Reasonable Ribbons - #13 Anything But a Card - Winter


Each year, my neighbor Diane hosts a neighborhood Christmas dinner party and I always make a gift to take to her. For this year's gift I decided to make glitter ornaments and a gift box.


Diane has three, much-loved dogs so I thought it would be fun to make the ornaments for the dogs. I used the "floor wax" technique and red Martha Stewart glitter to make the glitter ornaments. If you're not familiar with this technique ... check out this video. Using my Gypsy and Lyrical Letters, I sized and welded the letter of their names and cut them out of white vinyl. For the back of the ornaments, I cut this cute little dog using Paper Pups and the star from the Christmas Solutions cartridge. The dog's eye was too small to cut from the vinyl, so I used a paint pen to add a small dot. Each ornament is topped with a little red and white gingham ribbon from Stampin' Up.                                                     

The gift box is a 6" x 6" paper mache box. I painted it with three coats of Light Buttermilk Americana acrylic paint. I used paper from the DCWV Homemade Christmas stack to cover the sides and top of the box. The red striped ribbon is also from Stampin' Up. I adhered two pieces to both the box bottom and top, making sure they 'lined up' when the top was placed on the box. I added another piece of patterned paper to the inside of the lid to hide the ends of the ribbon. For the bottom of the box, the ribbon ends are hidden by tissue paper. I then tied a big bow on the top of the lid.


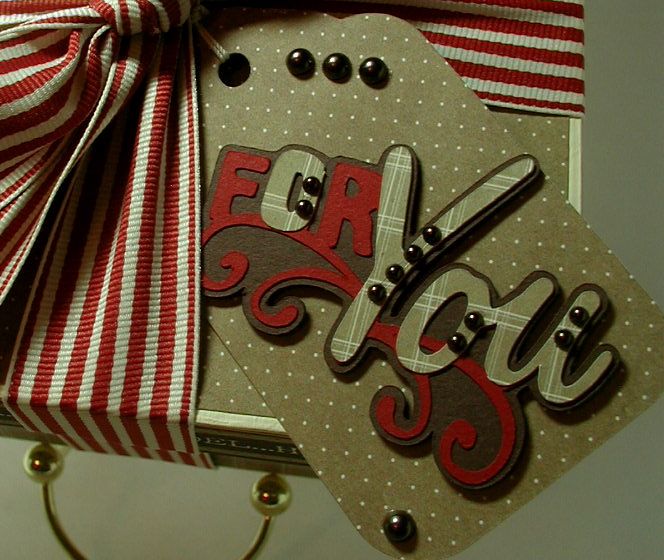
The tag and phrase were cut from the Winter Frolic cartridge using more of the DCVW paper and card stock from Stampin' Up. The tag was cut at 2.5" and the phrase was cut at 2". I used pop dots to attach the phrase to the tag and added some bronze pearls.
Here's a look at the complete project. Hope you like it ... thanks for stopping by!

Saturday, September 18, 2010

Fresh Fruit Basket


This is a peck size fruit box … the kind you get at a Farmer’s Market or a U-Pick-It orchard … that held some very tasty peaches. I knew I could put it to good use instead of just throwing it away. I entered this in the Cricut Circle Infomercial Contest. It wasn't selected, but I still love it!

Here are the details:

1.      1I used the Rectangle3 image from George and Basic Shapes (sized using my Gypsy) to cut strips of cardstock to cover the box, both inside and outside.
2.     2. Then, I used the Argyle Icon (shifted) image from Wild Card to create the “lattice”. Using my Gypsy, I sized and welding three images together to create lattice strips and wrapped them around the box.
3.     3. For the chalkboard, I used the Rectangle4 image from George and Basic Shapes to make the frame (sized and welding using my Gypsy).  I used a textured cardstock and rubbed it with distressing ink to make it look more like wood, and then attached it to a piece of black cardstock. 
4.     4. I used the Loop Dee Loo font from Lyrical Letters to create the “Fresh Fruit” … sized and welded with my Gypsy.
5.     5. All of the fruit images are from Preserves (cut from the cartridge, no Gypsy):
a.     Watermelon1 – 6.75”
b.     Blueberry1 – 2.75”
c.     Lemon – 3”
d.     Orange – 3.25”
e.     Strawberry1 – 2.75”
f.      Pineapple2 – 5.75”
g.     Grapes – 5.75”
6.     6. I attached the images to the box with pop dots (various sizes) to add dimension.
7.     7. For finishing embellishments, I added a crepe paper ruffle around the top edge of the basket and wrapped ribbon around the handle.

Saturday, July 24, 2010

It's Not Easy Being Pink Blog Hop!

Welcome to the My Pink Stamper's retiring design team's blog hop. We're taking this time to thank Robyn for the wonderful opportunity of being part of her first design team. If you've arrived here from Emma's blog, you're doing fine. If you just wandered into the blog hop, here's a list of everyone participating ... I don't want you to miss out on anything.


I'm very happy to be part of this blog hop. Because of my association with Robyn, I've had lots of 'firsts' over the last four months: my first time as a Design Team member, filmed my first video, made my first scrapbook layout, and now, participating in my first blog hop. Thanks, Robyn, it's been a fun ride.


For my 'Thank You' gift to Robyn, I decided to make  an altered box. I chose this project for a couple of reasons. One, I found a special little gift and I thought it would be fun to put it in a decorated box that she can keep and use as a memory box. Two, the project I submitted for her Design Team call was my Altered Baby Gift Box and I thought this would a fitting way to end.


So here are the details on my project: It's a 10" x 10" square paper mache box ... about 5" deep. I painted the inside white, the base pale pink, and the lid bright pink using acrylic paints. The printed papers and cardstock are from Stampin' Up. The flower was cut at 6.5" using the Cindy Loo cartridge.


I used the Lyrical Letters cartridge and my Gypsy to cut the 'My Pink' ...


and 'Memories' is from the Graphically Speaking cartridge.
                                                                                                                          To complete the box, I added a 'skirt' to the lid using a Martha Stewart border punch and finished it with a little satin ribbon.


Now, on to the fun stuff. This is what I'm offering for my blog candy:

There's a K & Company 'Black & Ivory Fusion' paper pack, 10 sheets of cardstock, 4 rolls of ribbon, some pearl trim and an Inkadinkado clear stamp set called ' Circles and Dots'.

All you need to do to be entered for a chance to win is leave a comment and a way to contact you (I'll ship to anywhere in the world!). How easy is that? I'll keep entries open until midnight CST on Sunday, July 25th and post the winner on Monday morning. So, don't be shy ... let me know what you think of my project.

Thanks for visiting! Now, hop on over to see the awesome project Karla has to show you.