Pages

Showing posts with label Imagine More. Show all posts

Friday, August 19, 2011

Cricut 360° Blog Challenge #8 ... Back To School


Happy Friday! Here's my project for this week's Cricut 360° Blog challenge ... where we're headed "Back To School".
For my project, I decided to alter a notebook. I started with an inexpensive composition book and covered it with paper I printed using my Imagine and the Imagine More cartridge. Then I used my Gypsy with George & Basic Shapes to make the chalkboard frame and backed it with black cardstock. The font is from Lyrical Letters ... sized and welded with my Gypsy.
I added some frosted gems (from Martha Stewart), lots of ribbon and a cute little owl charm.
Of course, I needed an apple, so I went with the apple and books from Hello Kitty ... sometimes I forget what a versatile cartridge this is!

So, there you have it! Now it's you're turn ... head on over to the Cricut 360° Blog and show us your "Back To School" stuff!!

Thanks for stopping by ...

Friday, July 15, 2011

Cricut 360° Blog Challenge #3 ... For Parents

Once again, I am absolutely amazed at the reponse we had for Challenge #2 ... are you ready for Challenge #3 from the Cricut 360° Blog? Well, July 24th is Parents' Day and we're making projects in honor of moms and dads everywhere.


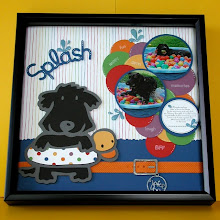
For my project, I started with a small, inexpensive frame ... the inside dimensions are about 4" x 11". I removed the glass and covered the backing with some patterned paper from Michael's. Then, using quick dry glue, I added  a crocheted trim to the inside edge.


I then selected word art from several cartridges and used my Imagine to print and cut. All of the papers were printed from the Imagine More cartridge. For each word, I selected a pattern and solid paper. Both printed and then cut at the same size. All the edges were inked using a coordinating Stampin' Up marker. I off-set the solid paper to create a shadow effect. Each word is pop-dotted ... they kind of look like they're floating! I finished by adding self-adhesive pearls to the background and the edge of the frame.


At that point, I thought it needed a little something else, so I decided to add a flower. I used the Mother's Day Bouquet cartridge and Imagine More patterns for the flower petals and leaves. Those were inked, as well, and I added a pearl, some crinkle ribbon, crochet trim and a little copper wire to finish. I'm really happy with this little flower. If you haven't tried making flowers with the Mother's Day Bouquet cartridge ... you're missing out!!

Here are the cartridges I used for the word art:

Family - Gypsy Wanderings cut @ 2.3
Together - Graphically Speaking cut @ 1.8
Forever - Home Decor cut @ 2.4
Love - Beyond Birthdays cut @ 1.4

Oh, I almost forgot ... everything was spritzed with Pearl Glimmer Mist ... for just a little sparkle!


Now it's your turn ... for our random drawing this week we have an Echo Park 'Dots and Stripes' paper pad. Good Luck!!


Thanks for stopping by ...

Saturday, April 9, 2011

A Belated Birthday Card

Here's another quick card I made using my Imagine. All of the papers and images are from the Imagine More Circut cartridge. I cut everything using the layers feature and I cut an extra flower so I could pop it up. The card base was made with cardstock from PaperTrey Ink and I added a few buttons, some twine and a sentiment from Verve Stamps. I'm still amazed at how quickly you can create a card with the Imagine!!

Thanks for stopping by ...

Wednesday, April 6, 2011

My First Imagine Card

Okay, I caved and bought the Imagine during the sale at Cricut.com ... wow, what took me so long!? I am so going to enjoy this machine.

This is my first Imagine project. After I set up the machine, and did the calibration and the update, I wanted to see how it would work with the original Cricut cartridges. I grabbed the cartridge that I had sitting on the counter and picked an image ... this is what I came up with. This image is from the Country Life cartridge and the patterns are from the Imagine More cartridge. I used a Peachy Keen stamp to add the smiley face on the sun.  The background paper and the cardstock for the card base were printed using the Hopscotch cartridge. (It's hard to tell from the picture, but the color of the card base matches the color of the clouds.) To finish,  I added the green cardstock, punched with a Martha Stewart border punch, a double-sided ribbon and a little bling. Quick, easy and fun.

I spent an afternoon playing with my Imagine and made several cards. I'll post the others over the next few days.

Thanks for stopping by ...