Pages

Tuesday, January 18, 2011

Baby Shower Gift Tags

My daughter and I went to a baby shower on Sunday. We took gifts for the mom, dad and new baby ... so I made tags for each. The tags were made using Tag, Bag, Boxes & More.
The 'for' is from Cake Basics, sized and welding using my Gypsy. The 'mom' and 'dad' cuts are from Beyond Birthdays.
 The 'baby' cut is from Gypsy Wandering.
The papers and card stock are from Stampin' Up. I added a little doodling and self-adhesive pearls and gems. Quick and easy!!

Monday, January 17, 2011

Stacey's Happy Birthday Smiley Cake Card

This is a card I made for my daughter's birthday. Isn't that a happy face? It's from the Smiley Cards Cricuit cartridge.
I used my Gypsy to weld two of the base images together to create a shaped card and sized the layers to fit. I ran the 'frosting' and candle 'flames' through my Xyron and then glittered them with Martha Stewart glitter. The cheeks and cake plate were embossed with UTEE.
I used Tags, Bags, Boxes and More to make a gift card holder and the sentiment is computer generated. We both started diets on January 1st, so I thought the sentiment was appropriate!!
If you'd like the Gypsy file for this ... click here.

Saturday, January 15, 2011

My Pink Stamper Blog Hop Challenge Card


 Thought I'd try the My Pink Stamper Blog Hop challenge ... if you'd like to try too, click here.
This is from the Lacy Labels Cricut cartridge. I used my Gypsy to weld two labels together to create the card base, then sized and cut the layers to fit. I ran the scalloped layer through my Xyron and glittered it with Martha Stewart glitter. The heart is stamped with a sentiment from My Pink Stamper's "Family and Friends" set, then embossed with UTEE. I love how this turned out ... hope you like it, too!
If you'd like the Gypsy file, click here.

Saturday, January 8, 2011

Beer Gift Card Holder


My nephew asked me to make a gift card holder for a card he was giving to his dad. I got my inspiration for this card holder here ... thanks, Enfys! To create the shape, I used my Gypsy to weld an oval shape from George and Basic Shapes to the top of the mug from Gypsy Wanderings. I also used my Gypsy to hide the details on the mug. I then cut the mug four times: once from cream card stock, once from gold card stock, once from vellum and once (flipped) from patterned paper. I clipped the handle from the gold card stock and then layered them all together. The foam was created with Tulip Puff Paint. I added a computer generated sentiment and a pocket, from Tags, Bags, Boxes and More, for the gift card. It's not quite as I had pictured it in my head ... but I think it works!

Saturday, January 1, 2011

Christmas Cards 2010


Here are few of the cards I made for Christmas 2010:


Just Because Cards
Peachy Keen Stamps
Tulip Puff Paint
DCVW Paper
PaperTrey Ink Card Stock
Martha Stewart Border Punch
Pearls and Ribbon


Winter Frolic
DCVW Paper
Stampin' Up Card Stock
PaperTrey Ink Card Stock
Stampin' Up Ribbon
Martha Stewart Glitter


Winter Frolic
DCVW Paper
Stampin' Up Card Stock
Cuttlebug Scrollwork Folder
Distress Ink
Champagne Mist Shimmer Paint
Martha Stewart Glitter
Ribbon inked with Distress Ink and Shimmer Paint

Thursday, December 30, 2010

Gifts for the Girls


I needed a little something for the women I work with, so I decided to make them some sugared hand scrub. I got the recipe for this from Carrie at Greenbean's Crafterole. Check out her blog ... she has some great projects.  For my containers, I used 4oz jelly jars. The scalloped circles and holly leaves are from the Winter Woodland Cricut cartridge. The 'berries' are frosted gems from Martha Stewart. The labels are computer generated, cut with Nestibilities and tied on with a little Stampin' Up ribbon. Quick, easy, fun-to-make, impressive  ... what more could you ask for! Thanks for stopping by.

Wednesday, December 29, 2010

Baby Shower Invitations - With Gypsy File

I can't take credit for this design ... it was originally done by Nancy Damiano, one of the designers from the Circut Circle blog ... but I did 'change it up' a little.
These were made using the cute Onesie on the Wrap it Up Cricut cartridge. Using my Gypsy, I eliminated the single hole; then I welded two circles from the George and Basic Shapes Cricut cartridge to the top of the shape to accommodate my ribbon.
Three layers make up each invitation: the top layer cut from designer paper using the Tag Feature, the bottom layer cut from card stock using the Tag Blackout Feature, and the center layer cut from a light-weight card stock (from the office supply section at WalMart) also using the Tag Blackout Feature. I cut the center layer just a bit smaller than the other two layers.
The layers are held together with the ribbon (no adhesive), and I added a little charm. These were actually very easy to make. I made 60 and they went together quickly. Also, they fit perfectly in an A2 size envelope . 
                                                                                        
                                                                                                      Gypsy File Download
If you're interested , you can download the Gypsy file and a Word file for the middle layer. The Gypsy file is designed so you can five images from a 12"x12" sheet of paper or card stock (for the top and bottom layers).


Word File Download

For the middle layer, the Gypsy file will cut two images from an 8.5" x 11" sheet of light-weight card stock. Lay your printed sheet on your mat as shown here.

Monday, December 27, 2010

Another Gift Box with Glitter Ornaments

This is a gift box I made for my friend Peggy. All the papers are from the DCWV Homemade Christmas stack and the card stock is Michael's Recollections brand.
The 'doily' cut is from the Picturesque Cricut cartridge. I spritzed it with water and crumpled it, then  inked it with distressed ink and Champagne Mist Shimmer Paint from Stampin' Up. I added a pleated strip ... also inked with the Champagne Mist.
 
The horn is from the French Manor Cricut cartridge. I cut each layer three times from a cream card stock and adhered them together. The horn was inked it with a bronze ink ... the valve piece was inked with brown. To finish, I embossed it with several coats of UTEE.
More Champagne Mist inked on the sides of the box, then I added a ribbon and some teal jewelry wire.

           
Here's a look at the glitter ornaments ... made using the 'floor wax' technique and Martha Stewart glitter. Check out this video for glitter ornaments instructions.

Sunday, December 12, 2010

For the Dogs

This was entered in the following challenges:

Circut Circle Blog - December Challenge
Fantabulous Cricut Challenge Blog - #39 Gifts Galore
Frosted Designs - Ribbon
Fussy & Fancy  Friday Challenge - #25 Anything But a Card
Pile it On - #48 It's All in the Wrapping
Really Reasonable Ribbons - #13 Anything But a Card - Winter


Each year, my neighbor Diane hosts a neighborhood Christmas dinner party and I always make a gift to take to her. For this year's gift I decided to make glitter ornaments and a gift box.


Diane has three, much-loved dogs so I thought it would be fun to make the ornaments for the dogs. I used the "floor wax" technique and red Martha Stewart glitter to make the glitter ornaments. If you're not familiar with this technique ... check out this video. Using my Gypsy and Lyrical Letters, I sized and welded the letter of their names and cut them out of white vinyl. For the back of the ornaments, I cut this cute little dog using Paper Pups and the star from the Christmas Solutions cartridge. The dog's eye was too small to cut from the vinyl, so I used a paint pen to add a small dot. Each ornament is topped with a little red and white gingham ribbon from Stampin' Up.                                                     

The gift box is a 6" x 6" paper mache box. I painted it with three coats of Light Buttermilk Americana acrylic paint. I used paper from the DCWV Homemade Christmas stack to cover the sides and top of the box. The red striped ribbon is also from Stampin' Up. I adhered two pieces to both the box bottom and top, making sure they 'lined up' when the top was placed on the box. I added another piece of patterned paper to the inside of the lid to hide the ends of the ribbon. For the bottom of the box, the ribbon ends are hidden by tissue paper. I then tied a big bow on the top of the lid.


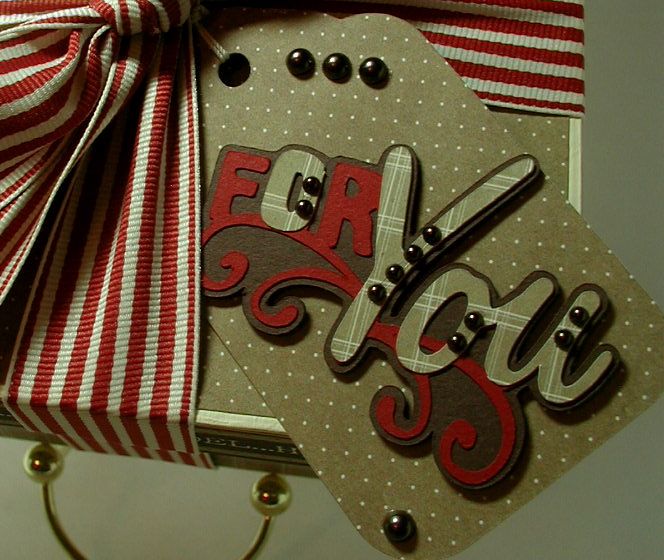
The tag and phrase were cut from the Winter Frolic cartridge using more of the DCVW paper and card stock from Stampin' Up. The tag was cut at 2.5" and the phrase was cut at 2". I used pop dots to attach the phrase to the tag and added some bronze pearls.
Here's a look at the complete project. Hope you like it ... thanks for stopping by!